


If you’re new to WordPress.com, you’ve probably heard about plugins and how they can add all kinds of useful features to your website. Before we jump into the installation process, though, there’s one important thing you need to know: plugins are only available on paid WordPress.com plans. If you’re using the free plan, you won’t be able to install or use third-party plugins on your site.
If you’re still figuring out how WordPress.com works, you may want to check out our guide, “What is WordPress.com”, first. It gives you a quick overview of the platform, how it works, and what you can do with a WordPress.com website. Once you understand the basics, getting familiar with plugins will make a lot more sense, especially when you want to add features that aren’t available out of the box.
The good news is that you don’t need to sign up for the most expensive plan just to use plugins. WordPress.com currently makes plugin installation available on every paid plan, including Personal, Premium, Business, and Commerce, so you can choose the plan that fits your needs.
Start Installing Plugins on WordPress.com
Installing plugins on WordPress.com doesn’t have to be complicated, especially once you know where to find the right options in your site dashboard. Whether you’re installing a plugin directly from the WordPress.com Plugins Marketplace or uploading a ZIP file from WordPress.org or another trusted source, the process only takes a few steps. Just make sure you’re using a WordPress.com paid plan that supports plugin installation before getting started.
As you add plugins to your website, try to keep things simple and only install the ones you actually need. Avoid adding several plugins that offer the same functionality, as this can create conflicts and make your site more difficult to manage. A smaller collection of reliable, well-maintained plugins is usually much easier to manage than a dashboard packed with plugins you rarely use.
It’s also worth making plugin maintenance part of your regular website routine. Keep the plugins you use updated, remove plugins you no longer need, and deactivate plugins that you only want to keep temporarily. Taking a few minutes to clean things up from time to time can make managing your WordPress.com website much easier.
Now that you know how to install, upload, activate, and remove plugins, you can start exploring the features that can make your website more useful. Take your time when choosing new plugins, check what each one does before installing it, and always download external plugin files from sources you trust.
👉 Upgrade Your WordPress.com Plan
So, if you’re currently using the free WordPress.com plan, you’ll need to upgrade before following the steps below. Once your paid plan is active, you’ll be able to access the plugin section from your dashboard and install plugins from the available plugin directory or upload a plugin file when needed.
And that’s where things get interesting, because installing a plugin on WordPress.com is actually pretty straightforward. You don’t need to be a developer or know your way around complicated code; you just need access to your WordPress.com dashboard and the plugin you want to install. In the next section, we’ll walk through the process step by step so you can get your first plugin up and running.
How to Install Plugins on WordPress.com
Once your WordPress.com plan supports plugins, installing one is pretty straightforward. Before you start adding plugins to your site, though, it’s worth taking a moment to think about what you actually need. Plugins can be incredibly useful, but installing too many of them can make your website harder to manage and potentially affect its performance.
You also don’t want to install several plugins that do basically the same thing. For example, if you need a plugin for SEO, caching, contact forms, or security, try to choose one reliable plugin instead of installing several with overlapping features. Having multiple plugins doing the same job can cause conflicts, duplicate features, unnecessary resource usage, and sometimes unexpected issues on your website.
A good rule of thumb is to install only the plugins you actually need and keep them updated once they’re installed. Before adding a new one, check what it does, whether you already have a plugin offering the same feature, and whether it’s compatible with your site. With that out of the way, let’s get into the actual installation process and see how you can install your first plugin on WordPress.com.
Step 1: Log In to Your WordPress.com Site Dashboard
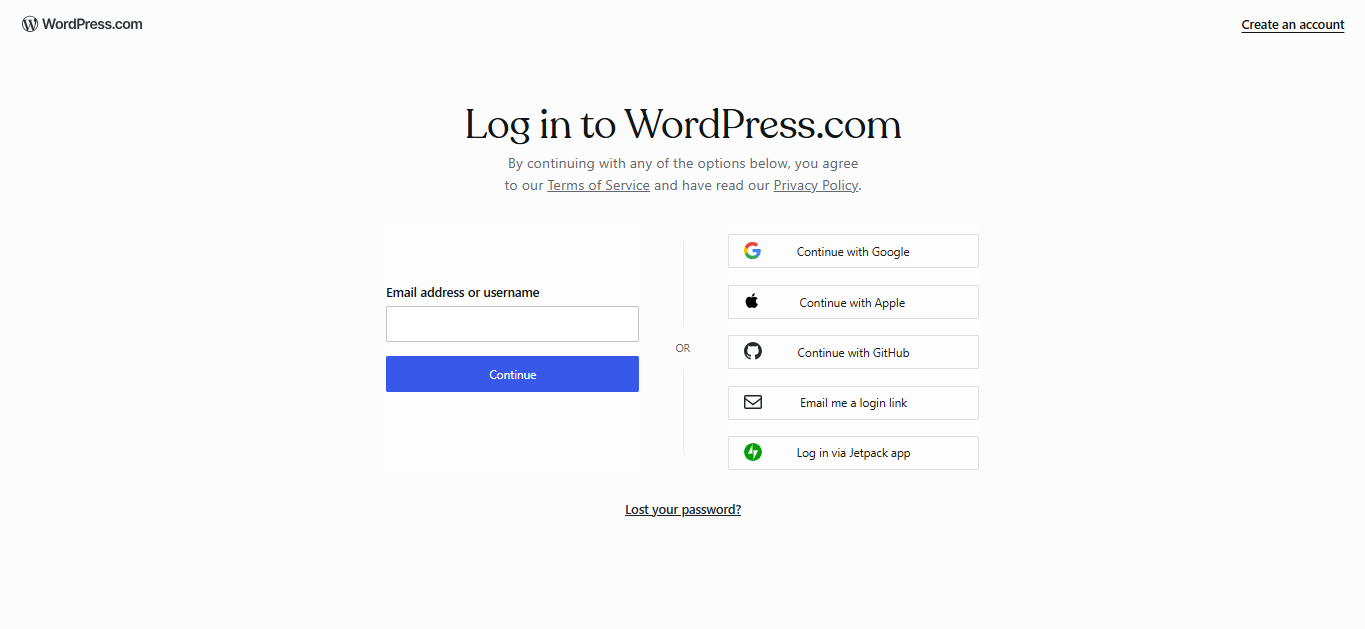
The first thing you need to do is log in to your WordPress.com site dashboard. The easiest way is to add /wp-admin to the end of your website address and open it in your browser. You’ll then be redirected to the WordPress.com login page, where you can enter the email address or username and password associated with your WordPress.com account.
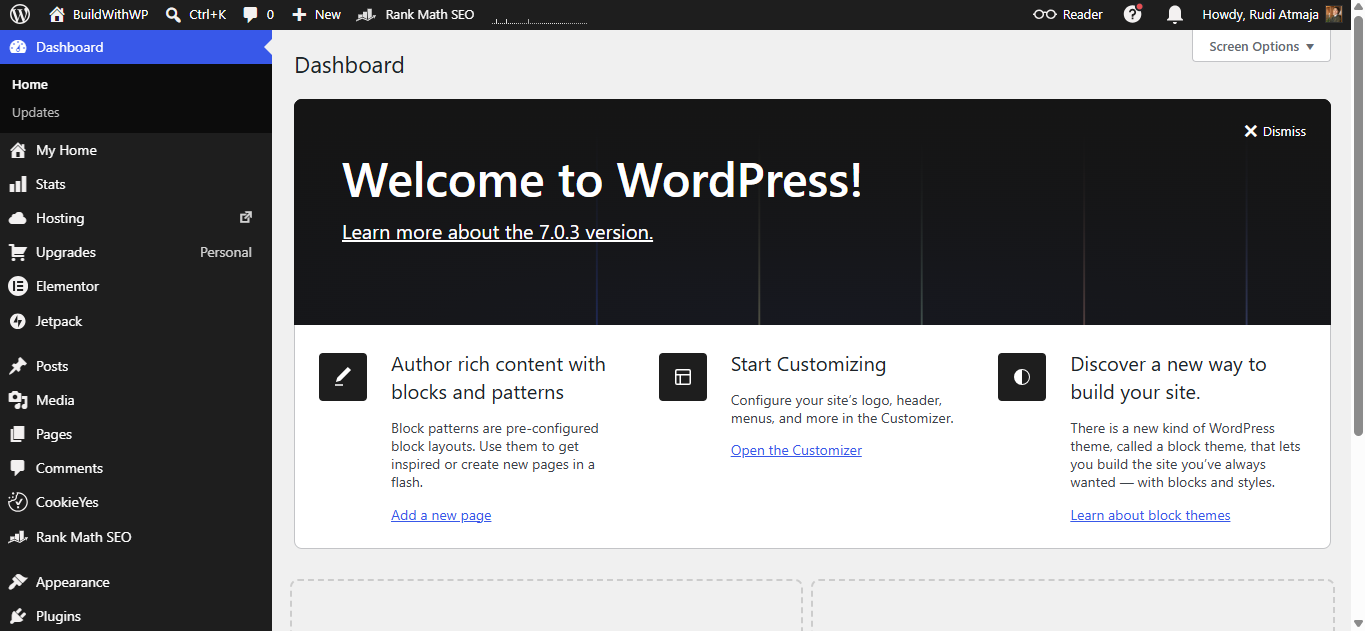
Once you’ve successfully logged in, WordPress.com will automatically take you to the dashboard of your website. This is the site-specific dashboard where you can manage your website, including its content, appearance, settings, and plugins. You don’t need to log in separately to access the site dashboard after authenticating through your WordPress.com account.
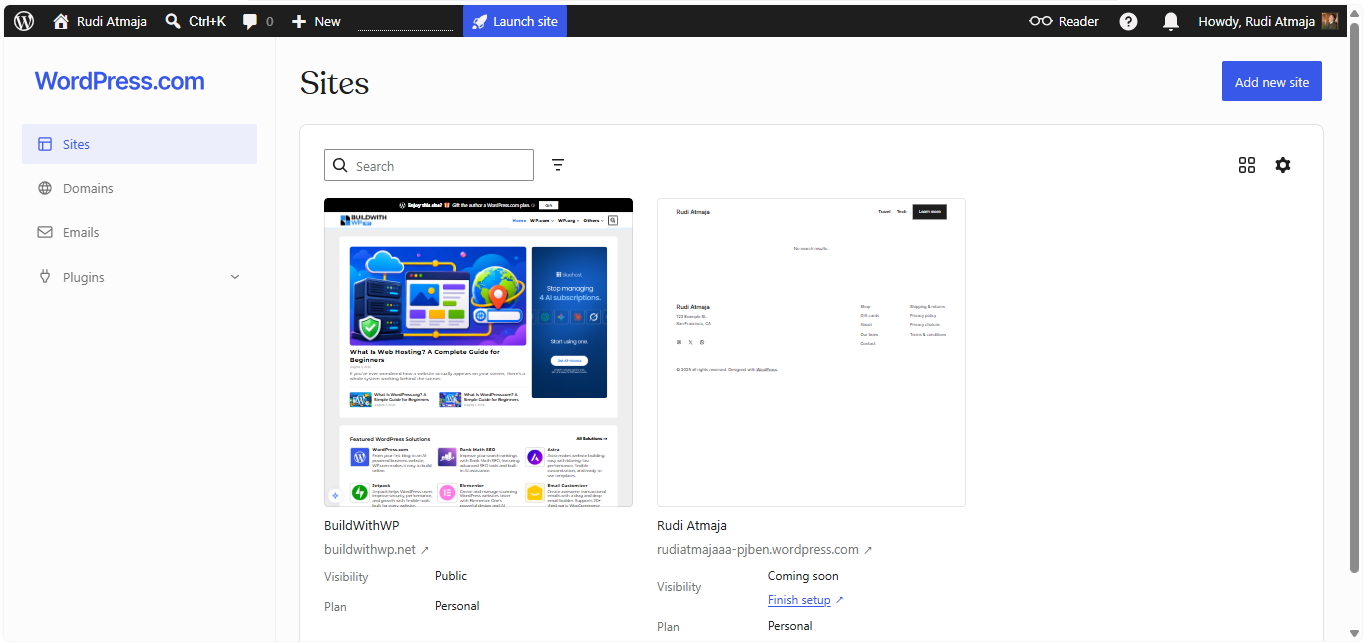
It’s also worth knowing that your site dashboard is different from the WordPress.com account dashboard at my.wordpress.com. The account dashboard gives you an overview of the websites connected to your WordPress.com account, while the site dashboard is focused on managing one specific website. For this tutorial, make sure you’re working inside the dashboard of the website where you want to install the plugin.
Step 2: Find the Plugin You Want
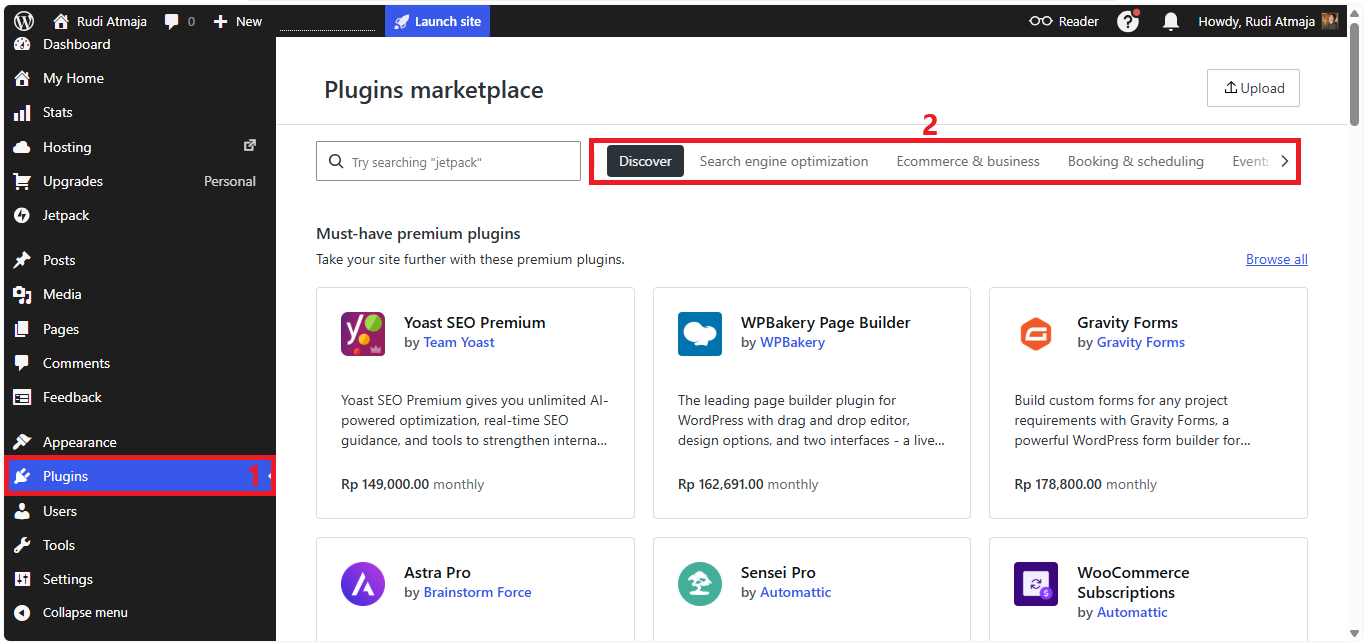
Once you’re inside your WordPress.com site dashboard, look at the navigation menu on the left and click Plugins. You’ll be taken to the plugin section, where WordPress.com organizes plugins into different categories such as Search Engine Optimization, Ecommerce & Business, and several other categories. This makes it easier to browse around if you’re not sure which plugin you want to use.
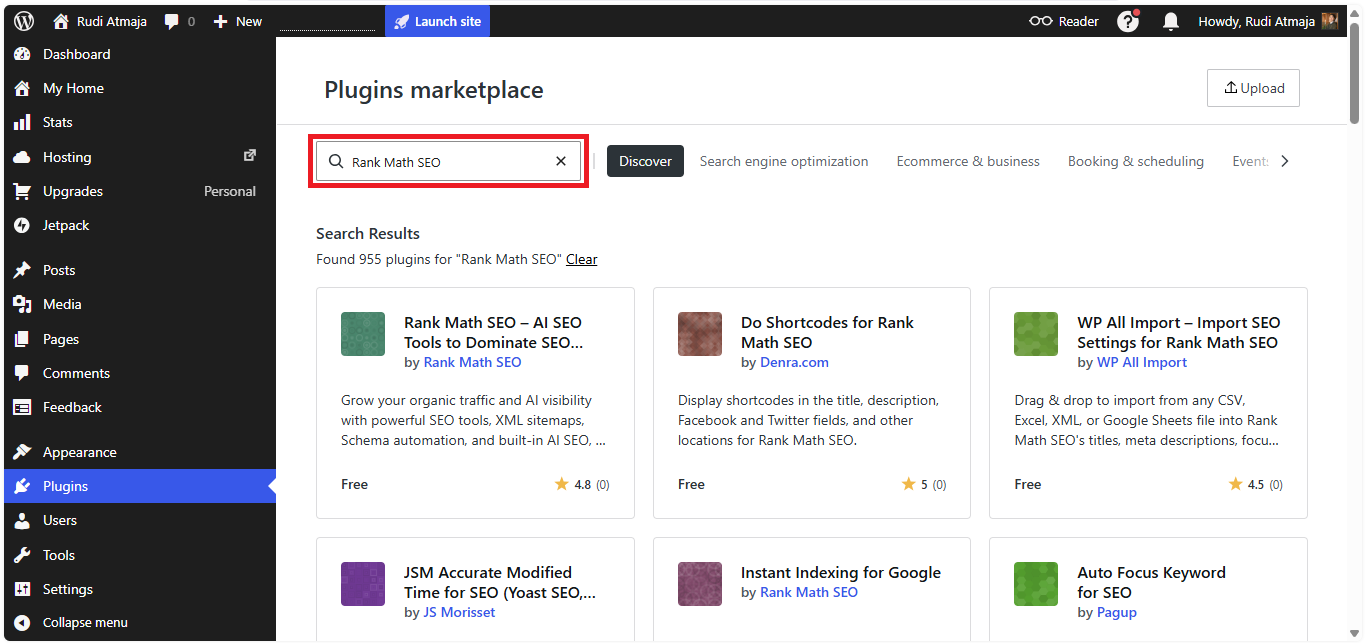
If you already have a specific plugin in mind, you don’t need to scroll through all those categories. Simply use the search box to look for the plugin by typing its name or a relevant keyword. WordPress.com will show matching plugins as you type, so you can quickly find the one you’re looking for.
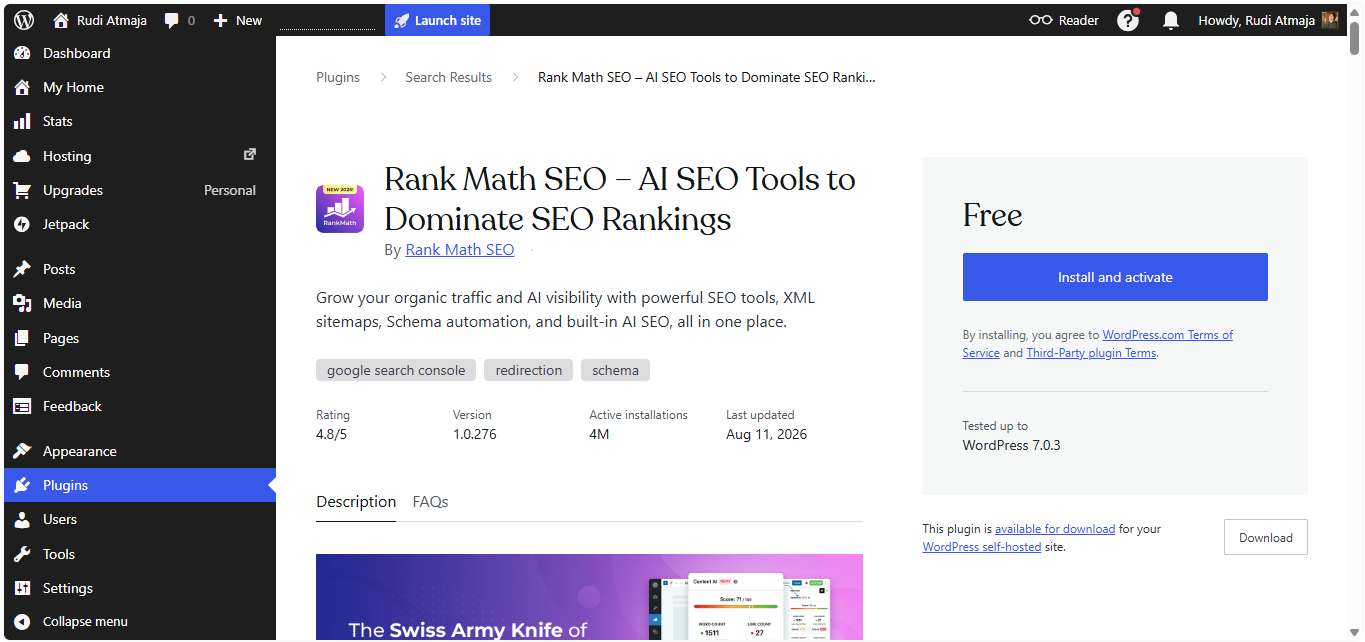
Before installing anything, it’s a good idea to take a closer look at the plugin first. You can click on the plugin card to open its information page, where you can check what the plugin does and learn more about its features. Take a moment to review the details before installing it, especially if you’re unfamiliar with the plugin or there are several similar options available.
Step 3: Install and Activate the Plugin
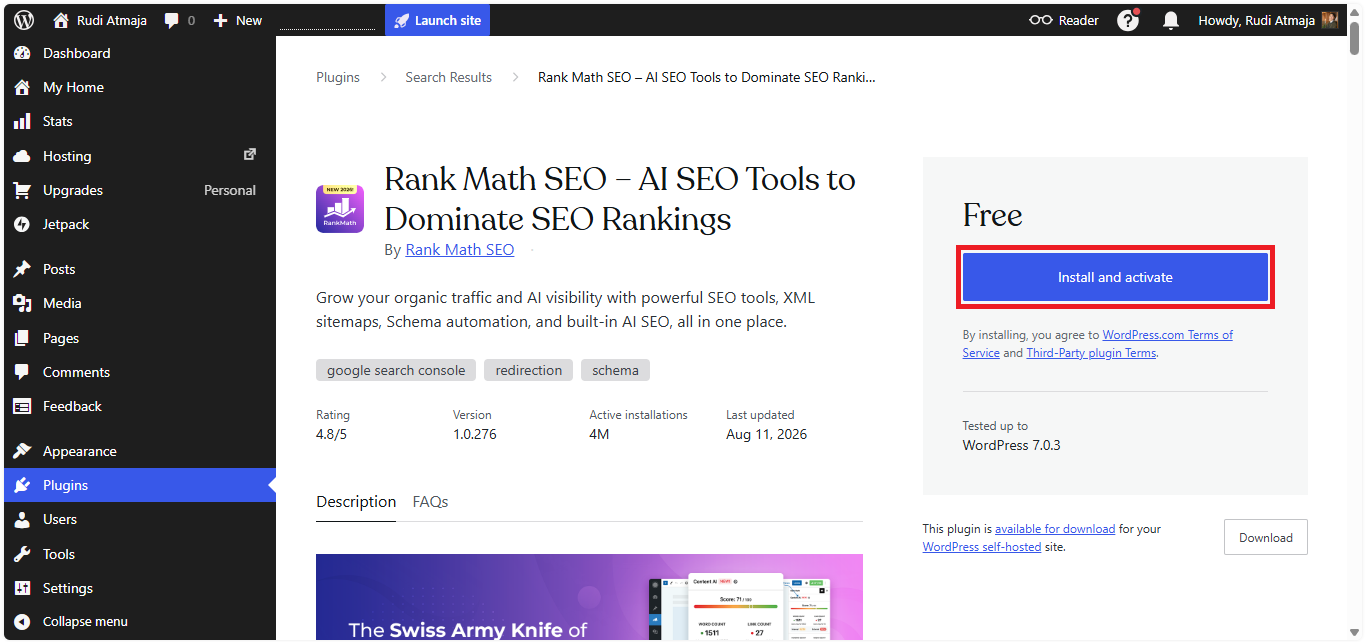
Once you’ve checked the plugin’s information and you’re sure it’s the one you want, it’s time to install it. On the plugin information page, look for the Install & Activate button and click it. WordPress.com will take care of the rest by automatically installing the plugin on your website and activating it right away, so you don’t have to go through a separate activation process.
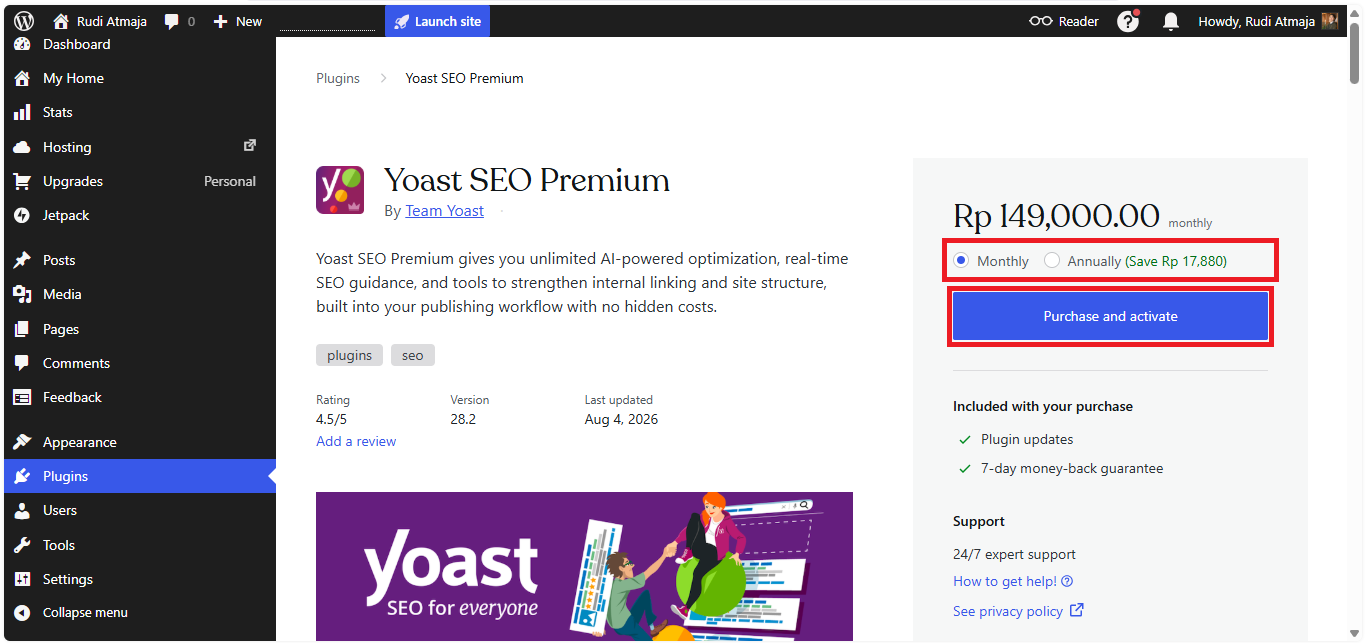
You’ll also come across some plugins that require a paid subscription. In that case, you’ll need to complete the purchase before WordPress.com can install and activate the plugin for you. On the plugin’s information page, choose the subscription duration you want, such as monthly or yearly, and then click Purchase & Activate.
You’ll be redirected to the checkout page to complete your purchase. Once the payment is successfully completed, WordPress.com will automatically install and activate the plugin on your site, so you can start using it right away without having to manually install the plugin afterward.
How to Install Plugins to WordPress.com from an External Source
Sometimes, the plugin you want to use may not be available directly in the WordPress.com plugin directory. If that happens, you can still install a plugin from an external source by uploading its plugin file to your website. This method is useful if you want to install a free plugin from the official WordPress.org plugin repository or use a plugin file you’ve downloaded from another source.
For example, you might find a free plugin on WordPress.org that you want to use on your WordPress.com website. Instead of searching for it in the WordPress.com plugin directory, you can download the plugin file from WordPress.org and then upload it to your site. The same process also works for plugin files you’ve obtained directly from a plugin developer or another trusted source.
Before you upload anything, make sure you’re downloading the plugin from a trustworthy source. If you’re getting a plugin from somewhere other than WordPress.org or the developer’s official website, be especially careful, as modified or unofficial plugin files can contain malicious code or other unwanted changes. You’ll typically need the plugin as a ZIP file, so make sure you have the correct installation file ready before continuing.
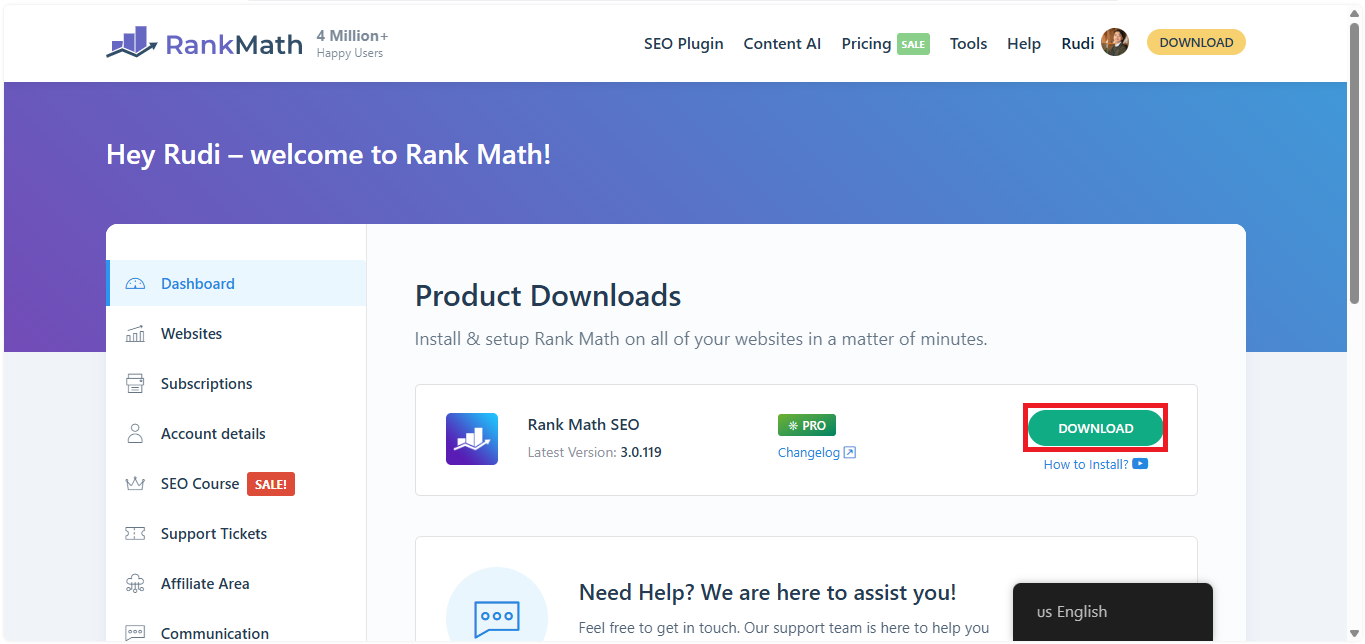
Once you have the plugin ZIP file on your computer, you can upload it directly from your WordPress.com site dashboard. The process only takes a few steps, and WordPress.com will install the plugin for you after you upload the file. Let’s take a look at how to do it.
Step 1: Log In to Your WordPress.com Site Dashboard
First, log in to the WordPress.com site dashboard where you want to install the external plugin. Just add /wp-admin to the end of your website address and open it in your browser. You’ll be redirected to the WordPress.com login page, where you can enter your WordPress.com account credentials.
After you’ve logged in successfully, WordPress.com will automatically take you to your website’s dashboard. Make sure you’re inside the dashboard of the correct website, especially if you manage multiple WordPress.com sites from the same account. Once you’re there, you’ll be ready to upload the plugin file from your computer.
You don’t need to log in separately to your WordPress.com account dashboard to complete this step. The /wp-admin address takes you through the WordPress.com login process and then sends you directly to the dashboard of the site you’re working on. From there, you can continue to the Plugins section and start uploading your plugin ZIP file.
Step 2: Open the Plugins Marketplace
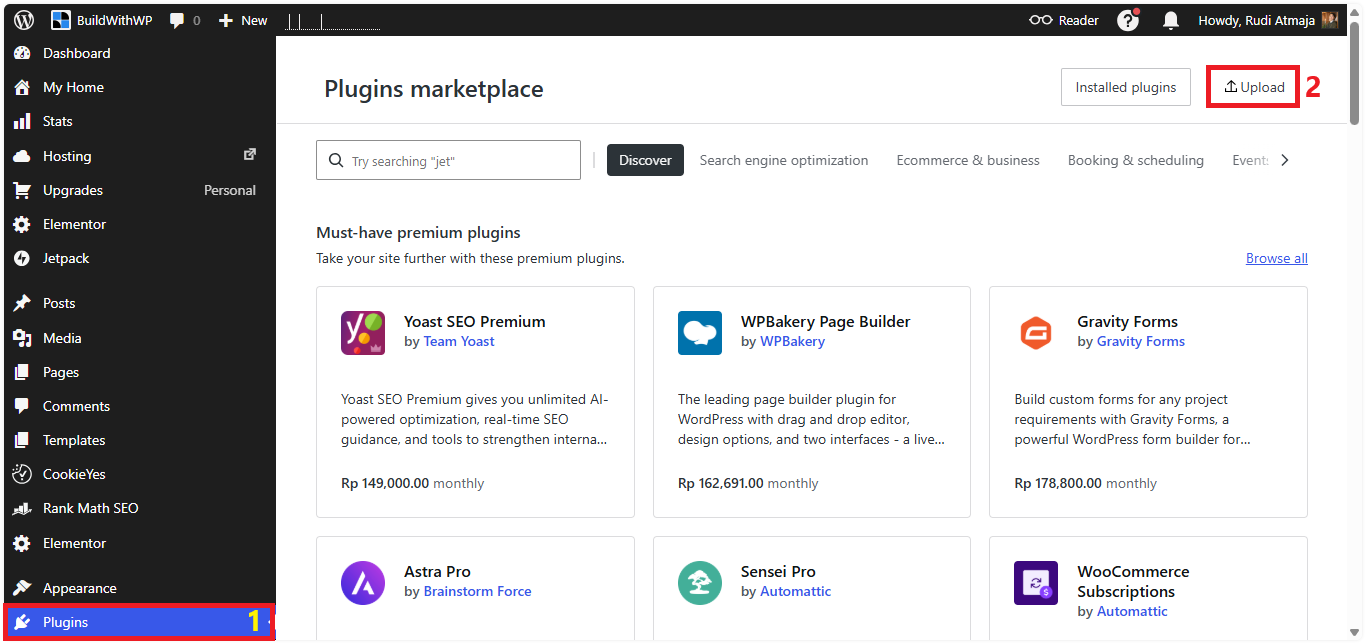
Once you’re inside your WordPress.com site dashboard, look at the navigation menu on the left and click Plugins. This will take you to the Plugins Marketplace, where you can browse, search for, and manage plugins for your website.
Since you’re installing a plugin from an external source, you don’t need to search through the available plugins in the marketplace. Instead, look at the upper-right corner of the page and click the Upload button. This is where you can upload a plugin file that you’ve downloaded from WordPress.org or another trusted source.
After clicking Upload, WordPress.com will take you to the plugin upload screen. From there, you’ll be able to select the plugin file from your computer and continue with the installation process.
Step 3: Upload and Activate the Plugin
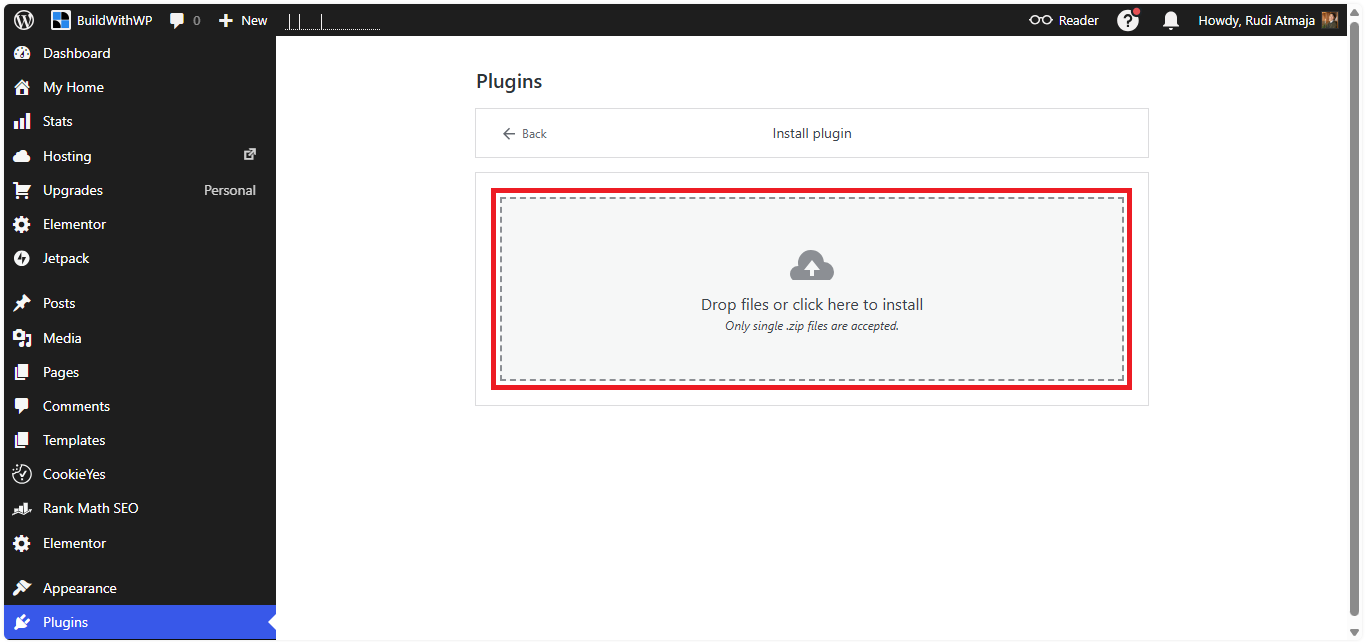
Now it’s time to upload the plugin file you downloaded earlier. You can simply drag and drop the plugin ZIP file into the upload area, or click the upload area and select the ZIP file from your computer. Make sure you’re uploading the correct plugin file before continuing.
Once you’ve selected the ZIP file, WordPress.com will handle the rest of the process automatically. It will upload the file, install the plugin, and activate it on your website without requiring you to go through each step manually.
After the process is complete, the plugin will be ready to use on your WordPress.com website. You can then configure its settings or start using its features, depending on how the plugin works.
How to Delete a Plugin on WordPress.com
Installing a plugin is easy, but knowing when to remove one is just as important. Over time, you may install a plugin to test a feature, replace it with another tool, or simply realize that you no longer need it. Keeping unnecessary plugins on your site can add clutter to your dashboard, create overlapping functionality, and potentially introduce security or compatibility issues, so it’s a good idea to regularly review the plugins you have installed.
WordPress.com recommends keeping your site lean by using only the plugins you actually need. Removing plugins you no longer use can help keep your site secure, make your dashboard easier to manage, and avoid situations where multiple plugins try to provide the same functionality. It can also be useful when you’re troubleshooting a website problem, especially if you suspect that a particular plugin is causing an error or conflict.
Before permanently deleting a plugin, however, make sure you really don’t need it anymore. Deleting a plugin will often remove its settings and content, so you may not be able to restore everything simply by installing it again later. If you think you might need the plugin again, or you’re only removing it temporarily while troubleshooting, deactivating it is usually the better option because the plugin remains installed and can be activated again later.
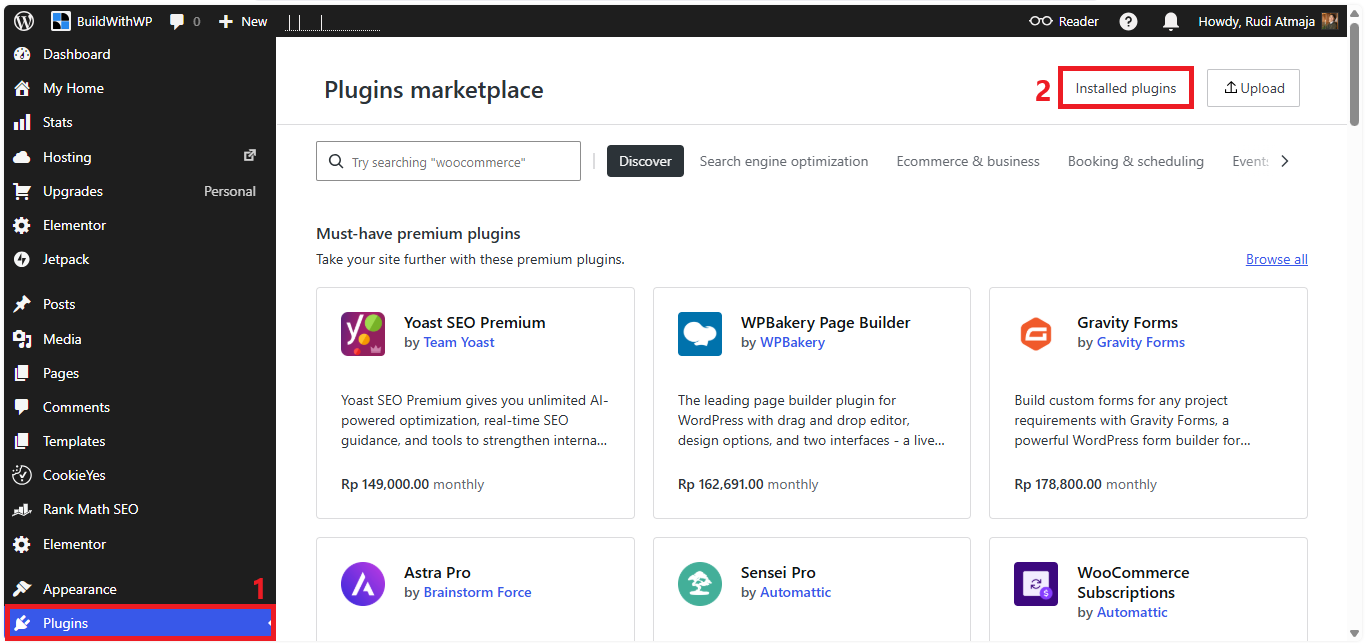
To permanently remove a plugin, start by opening your WordPress.com site dashboard and going to Plugins → Installed Plugins. Find the plugin you want to remove in the list, then click Deactivate and wait for the page to reload. Once the plugin has been deactivated, find it again and click Delete to permanently remove it from your website.
Keep in mind that some plugins may have special requirements before they can be removed. For example, WooCommerce cannot be deactivated or deleted while certain companion plugins that depend on it are still active, while some WordPress.com-managed plugins such as Jetpack and Akismet cannot be deactivated normally. If you’re removing a plugin because it’s causing problems, it’s also worth checking whether the plugin is actually responsible before deleting it permanently.
Start Installing Plugins on WordPress.com
Installing plugins on WordPress.com doesn’t have to be complicated, especially once you know where to find the right options in your site dashboard. Whether you’re installing a plugin directly from the WordPress.com Plugins Marketplace or uploading a ZIP file from WordPress.org or another trusted source, the process only takes a few steps. Just make sure you’re using a WordPress.com paid plan that supports plugin installation before getting started.
As you add plugins to your website, try to keep things simple and only install the ones you actually need. Avoid adding several plugins that offer the same functionality, as this can create conflicts and make your site more difficult to manage. A smaller collection of reliable, well-maintained plugins is usually much easier to manage than a dashboard packed with plugins you rarely use.
It’s also worth making plugin maintenance part of your regular website routine. Keep the plugins you use updated, remove plugins you no longer need, and deactivate plugins that you only want to keep temporarily. Taking a few minutes to clean things up from time to time can make managing your WordPress.com website much easier.
Now that you know how to install, upload, activate, and remove plugins, you can start exploring the features that can make your website more useful. Take your time when choosing new plugins, check what each one does before installing it, and always download external plugin files from sources you trust.