


How to Build a Business Website Without Coding – Building a business website might sound like a job for developers, but it really doesn’t have to be. With the right tools, you can get a professional-looking site online without touching a single line of code. In fact, you can build the whole thing yourself even if you’re completely new to website creation.
That’s where WordPress comes in. WordPress gives you a flexible way to create a business website without forcing you to learn HTML, CSS, PHP, or other technical stuff first. Instead of spending weeks figuring out how websites work, you can focus on making your site useful, attractive, and ready for your customers.
For this guide, we’ll be using WordPress.org rather than WordPress.com. If you’re still wondering what WordPress.org actually is and how it differs from WordPress.com, check out my other article, “What Is WordPress.org?” before we get started. It’ll give you a quick overview so you know exactly which platform we’re working with here.
Once that’s clear, the process becomes much less intimidating. You’ll need a few basic things to get started, including a domain name, web hosting, and a WordPress installation. Don’t worry, though – you won’t need to become a tech expert just to get these pieces working together.
The fun part is that WordPress does most of the heavy lifting for you. You can choose a theme, add useful plugins, create your pages, and customize the site without writing code from scratch. With a little planning, your business website can go from a blank screen to something your customers can actually use.
Of course, building a website quickly doesn’t mean throwing everything together and calling it done. Your website still needs to look professional, load properly, make sense to visitors, and clearly explain what your business offers. The good news is that you can handle all of that step by step without getting buried in complicated technical details.
So, if you’re ready to stop overthinking the process and finally get your business online, let’s build the website together. We’ll start from the basics and work our way toward a complete WordPress business website, all without coding. By the end, you’ll have a much clearer idea of how to turn your business idea into a website that’s ready for real visitors.
What You Need to Start a Business Website
Ready to put your business online? Before we start clicking around in WordPress, let’s take a quick look at what actually goes into getting a business website off the ground. Don’t worry, we’re not diving into anything technical yet – you just need to know the basic pieces that will come into play.
Think of your website as your business’s home on the internet. You want it to have a clear identity, give visitors the right information, and make it easy for them to take the next step, whether that means contacting you, booking a service, or buying something. Once you know what your website needs to do, the whole building process becomes a lot easier.
And that’s exactly what we’re going to sort out next. We’ll go through the essentials one by one, so you know what you’re working with before we start putting your WordPress website together. Ready? Let’s get into it.
1. Web Hosting and Domain Name
Let’s start with two things your website simply can’t do without: web hosting and a domain name. Think of your domain as your website’s address and hosting as the place where all your website files live. If you’re still getting familiar with hosting, you can check out my other article, “What Is Web Hosting?” for a quick explanation before moving on.
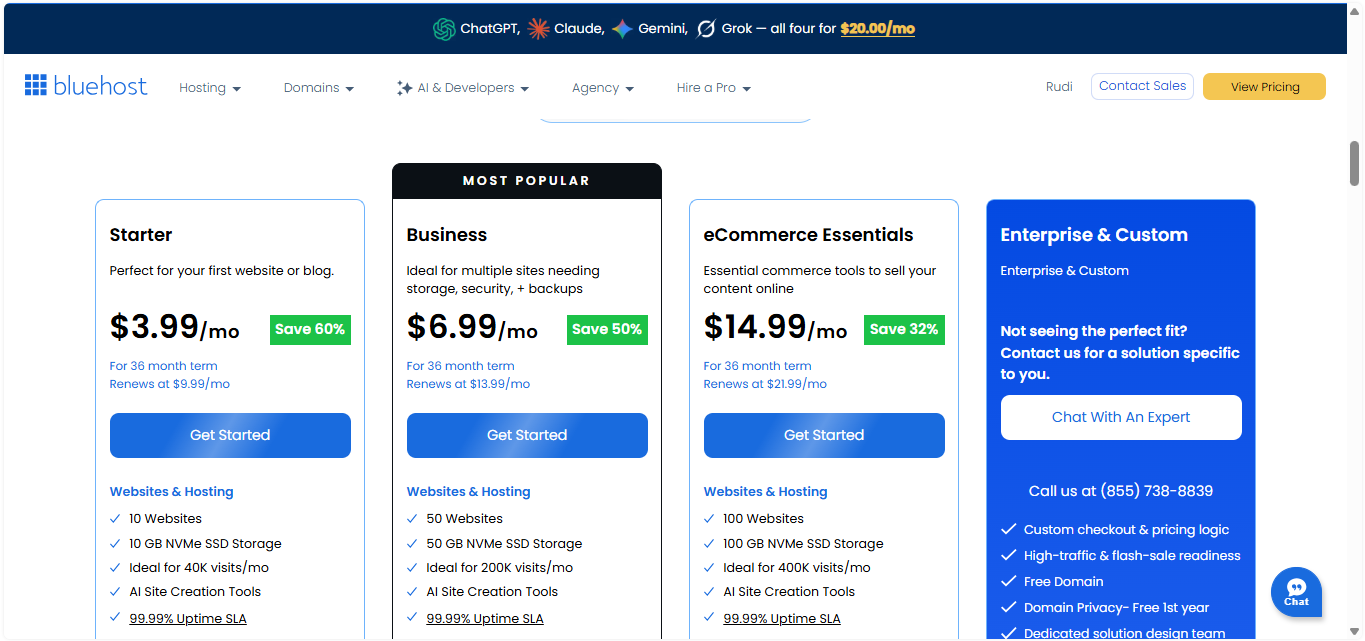
For a basic business website, Bluehost can be a practical place to start. Its shared hosting is designed for smaller websites, and you can get a domain name free for the first year with eligible hosting plans, which means you can get the basics online without spending more than necessary. It’s a solid option if you’re launching a simple company website, service business, portfolio, or local business site.
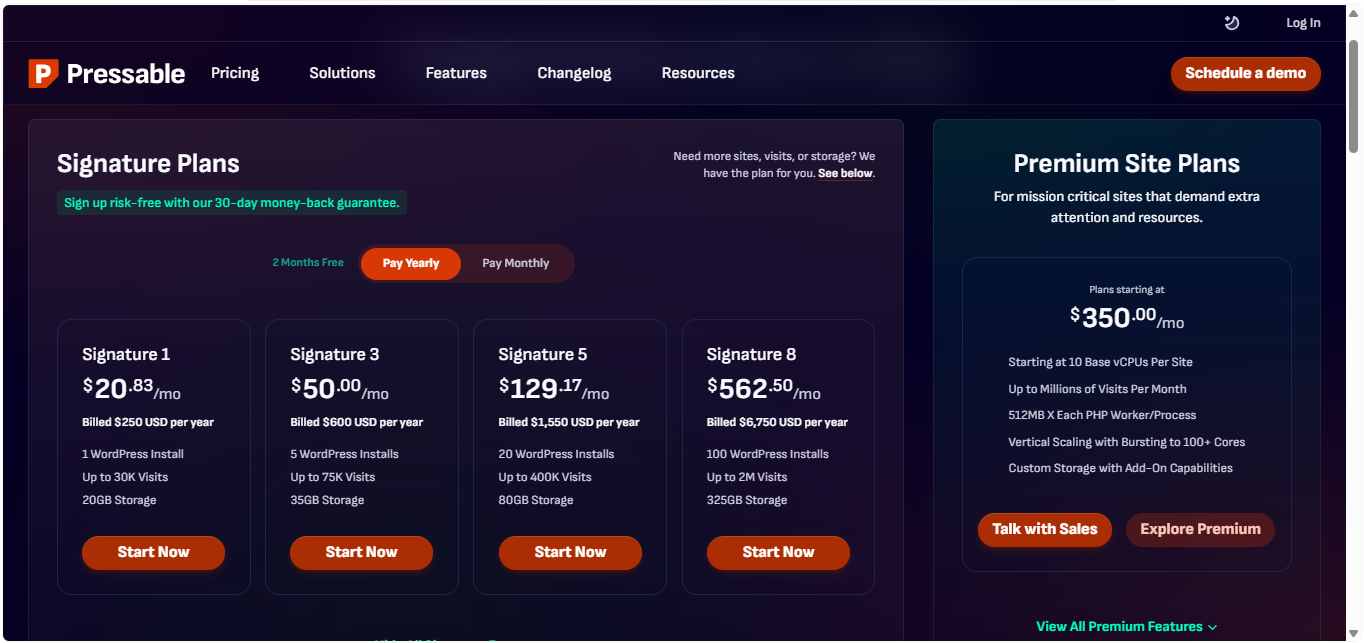
If you’re planning something bigger, though, you’ll want to think beyond basic shared hosting. Pressable is a strong option for a business website that needs managed WordPress hosting and room to handle more demanding traffic. You can also consider Kinsta or a Bluehost VPS if you expect your website to grow significantly or you’re building a company website that could attract high traffic.
The important thing is not to overcomplicate this decision from day one. If you’re launching a straightforward business website, shared hosting may be all you need, while a larger and busier website deserves more powerful hosting. Pick the option that matches where your business is right now, while keeping future growth in mind.
👉 Visit Bluehost | 👉 Visit Pressable | 👉 Visit Kinsta
2. Gutenverse Pro
Now, let’s make the website-building part a whole lot easier. Instead of starting with a completely blank WordPress page and building every section yourself, we’ll use Gutenverse to give us more blocks, layouts, and ready-made designs to work with. This can save you a ton of time, especially when you’re building a business website and want it to look polished without spending hours tweaking everything.
For this guide, we’ll be using Gutenverse Pro because it unlocks more blocks and a much larger collection of pre-built demos. That means you can start with a layout that already looks close to what you want, then replace the demo content with your own business information, images, services, and branding. It’s a much faster approach than staring at an empty page and wondering where to begin.
That said, Gutenverse Pro isn’t required. You can still follow this guide using the free version of Gutenverse and build a perfectly functional business website. The Pro version simply gives you more options and makes the process faster, so consider it a convenience rather than a requirement.
If you want to get your website online quickly and avoid unnecessary design work, though, the extra blocks and pre-built demos can make a noticeable difference. Instead of building everything from scratch, you’ll have a much stronger starting point and can spend more time making the website feel like your actual business.
How to Build a Business Website
Now that the basic tools are out of the way, it’s time to actually build your business website. This is where things get interesting because you won’t be staring at a blank WordPress screen and trying to figure out what goes where. We’ll build the site step by step, keeping everything as simple as possible.
The goal here isn’t to create a website that merely looks nice. You want something that tells visitors what your business does, makes a good first impression, and gives them an obvious reason to stick around. Every section we add should have a purpose, rather than simply filling up space on the page.
And no, you won’t need to write code to make it happen. WordPress and Gutenverse will handle most of the technical work behind the scenes, while you can focus on choosing the right content and shaping the website around your business. Even if this is your first WordPress website, you should be able to follow along without getting lost in developer jargon.
So, let’s stop talking about it and start building. We’ll begin with the first part of the setup and work our way toward a complete business website, one step at a time. By the end of the process, you’ll have something much more useful than an empty WordPress installation – it’ll be a website you can actually put in front of your customers.
1. Install the Unibiz Theme
The first thing we need to do is give your WordPress website a proper foundation, and that starts with the theme. For this guide, we’ll use Unibiz, a business-focused WordPress theme that works especially well for company websites, agencies, corporate sites, consulting businesses, and other professional websites. It gives you a clean starting point without forcing you to build the entire design from scratch.
The best part? Unibiz is available for free, so you don’t need to spend anything on the theme to follow this tutorial. There is also a Pro version with additional features and customization options, but we’ll stick with the free version throughout this guide. That way, you can follow along without needing to purchase an upgrade just to recreate the website.
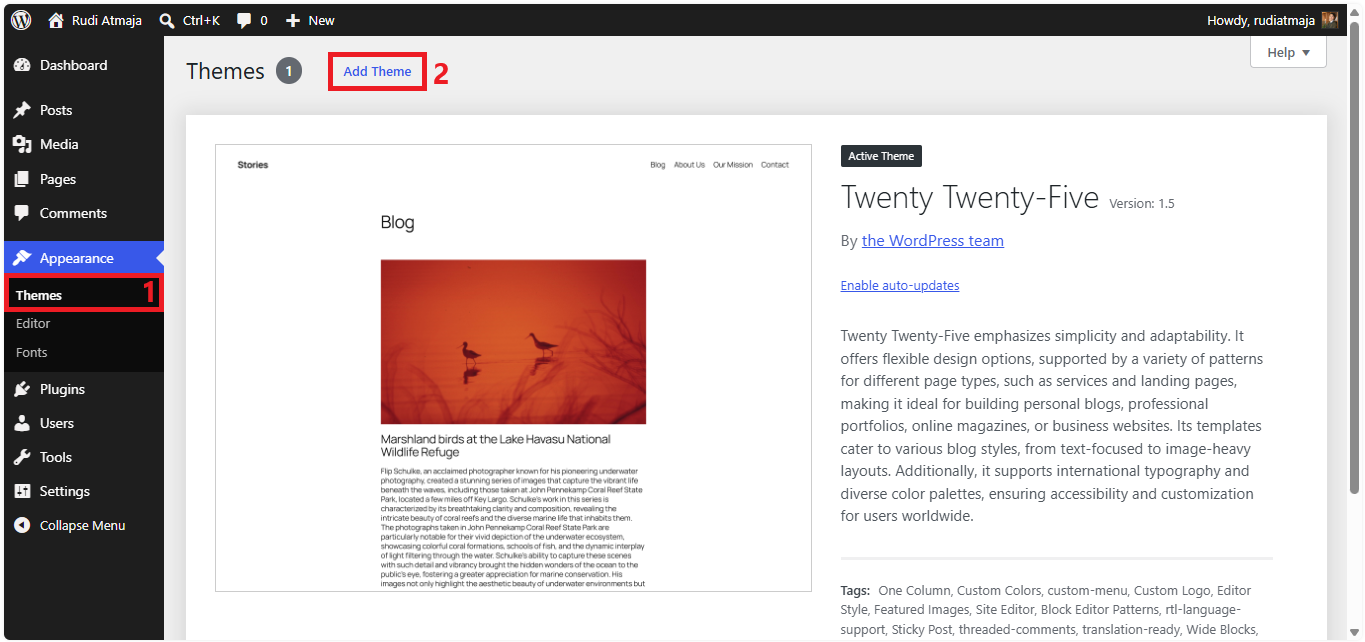
To install Unibiz, log in to your WordPress dashboard first. From the left-hand menu, go to Appearance > Themes, then click the Add New Theme button at the top of the page. You’ll be taken to the WordPress theme directory, where you can search for themes that are available directly from WordPress.org.
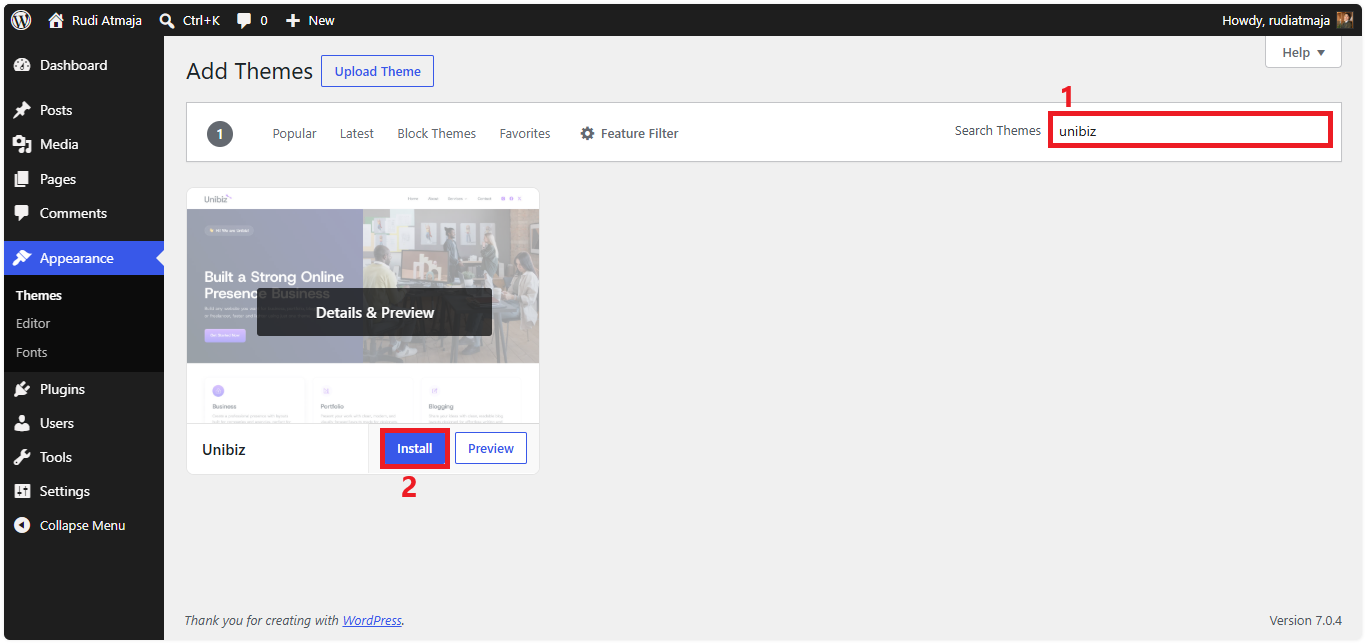
In the search box, type “Unibiz” and wait for the results to appear. Once you find the Unibiz theme, click Install. WordPress will download and install the theme automatically, so you don’t need to upload any files manually.
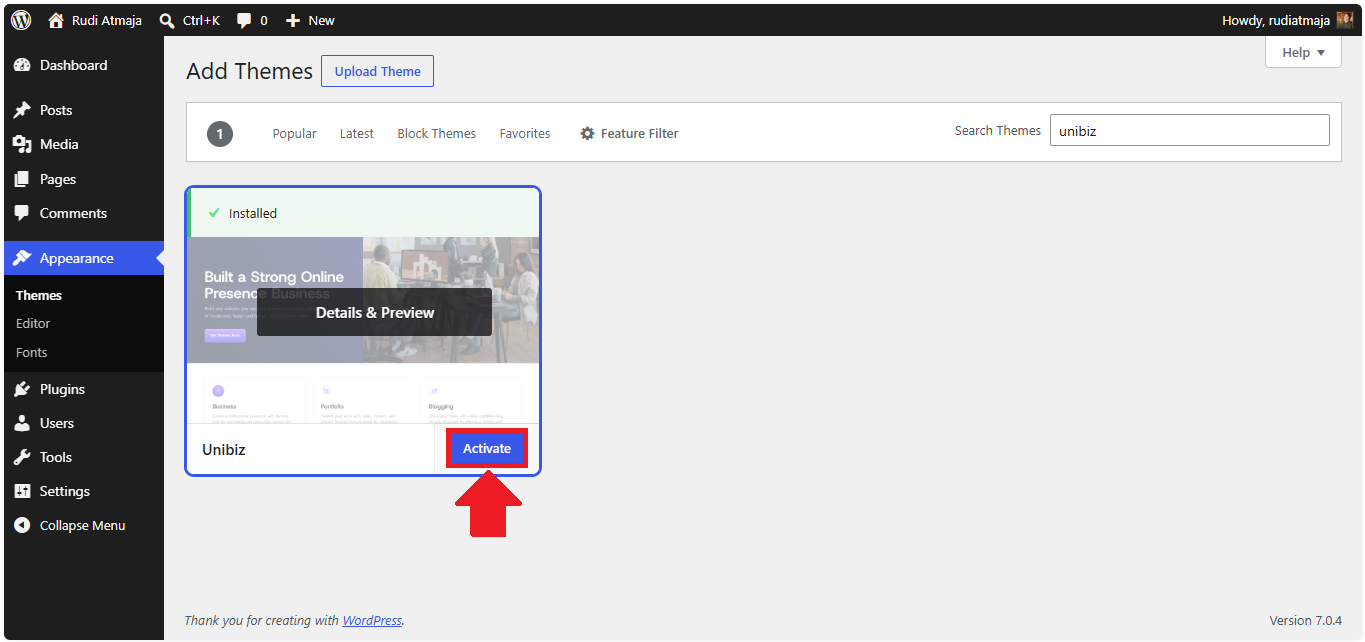
Once the installation finishes, the button will change to Activate. Click it to make Unibiz your website’s active theme. WordPress will then switch your website over to the new theme, giving you the starting point we need for the next steps.
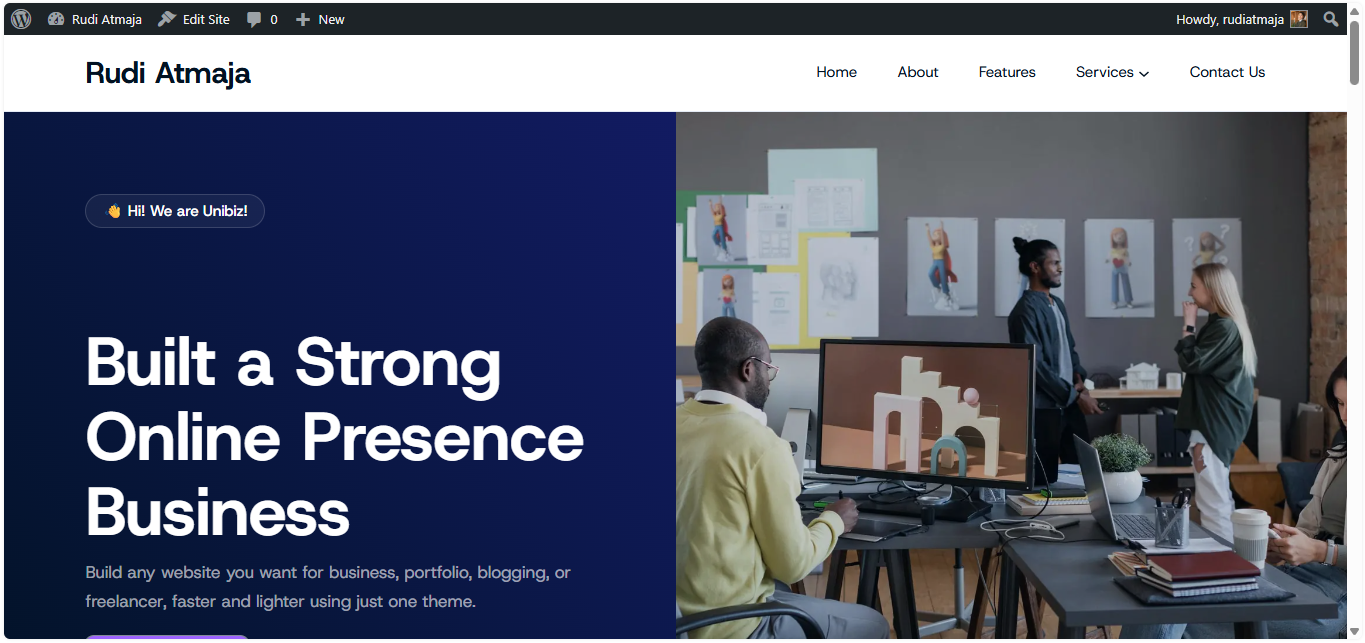
After activating Unibiz, open a new tab in your browser and enter your website’s address. You’ll see that your site is now using Unibiz’s default design. Don’t worry if it doesn’t look like the business website you have in mind just yet – we’ll continue working on the design, layout, and content in the next step to turn this basic Unibiz setup into a complete business website.
2. Install the Gutenverse Plugin
Now that Unibiz is active, it’s time to install Gutenverse. The easiest part is that you don’t need to search for the free plugin manually because Unibiz already gives you a shortcut to install it. This is also the plugin we’ll use to build and customize the website without writing any code.
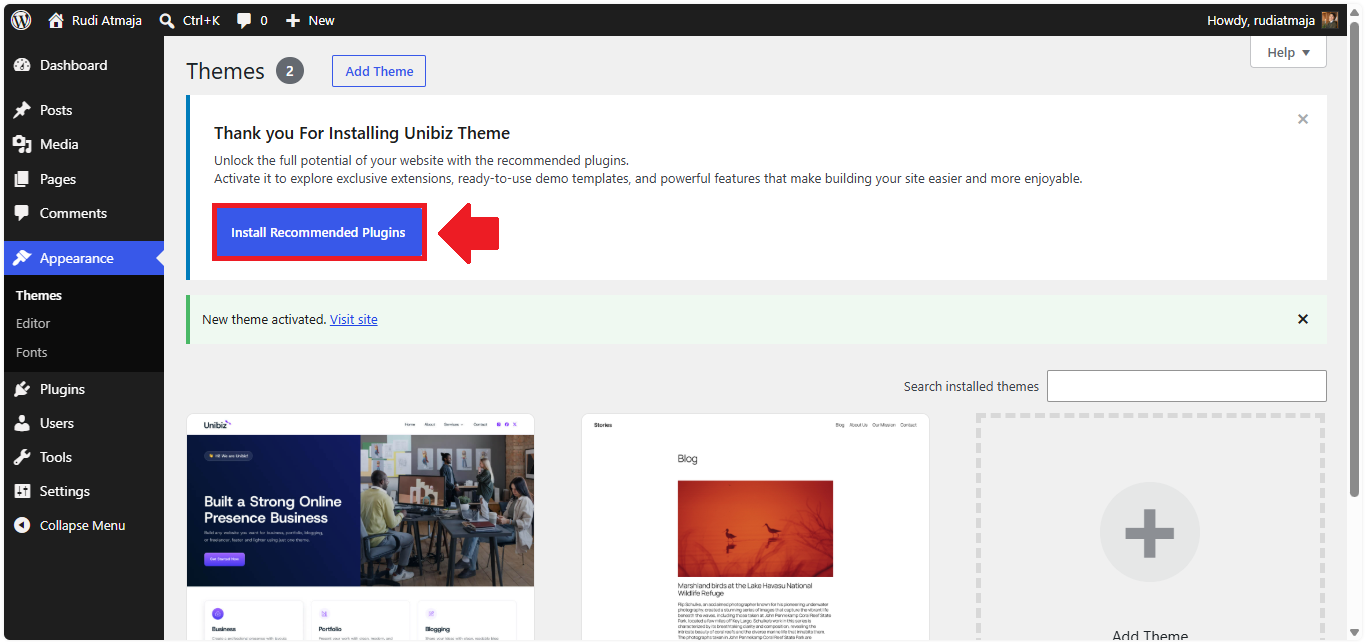
After activating the Unibiz theme, go back to your WordPress dashboard and look for a box that says “Thank you For Installing Unibiz Theme.” Inside this box, you’ll find the “Install Recommended Plugins” button. Simply click it, and WordPress will automatically install and activate the free Gutenverse plugin recommended by the Unibiz theme.
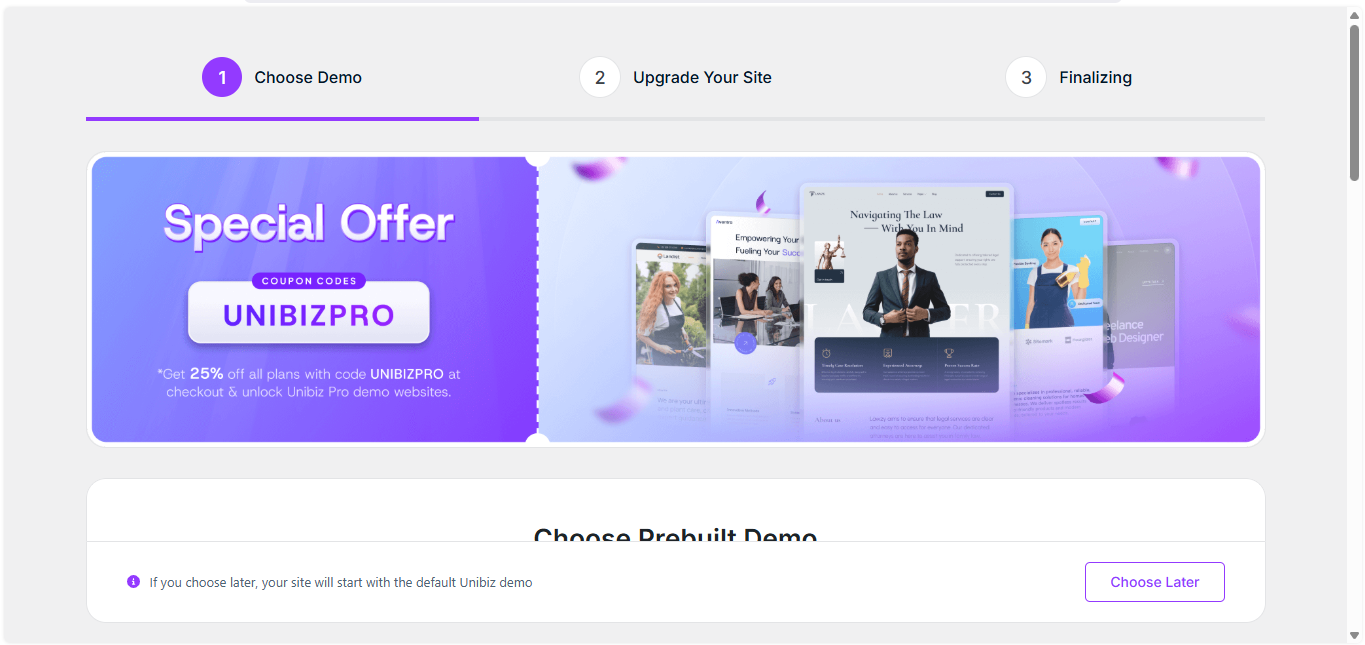
Once Gutenverse Free is activated, you’ll automatically be taken to the Gutenverse Companion Wizard. You can take a quick look around the wizard, but for this tutorial, you can simply return to your WordPress dashboard (yourdomain.com/wp-admin) when you’re ready to continue. From there, we can move on to installing Gutenverse Pro if you’ve already purchased it.
If you have Gutenverse Pro, head over to pro.gutenverse.com/login and sign in to your Gutenverse account. From your account page, download the Gutenverse Pro ZIP file to your computer. You’ll need this ZIP file to install the Pro plugin manually through WordPress.
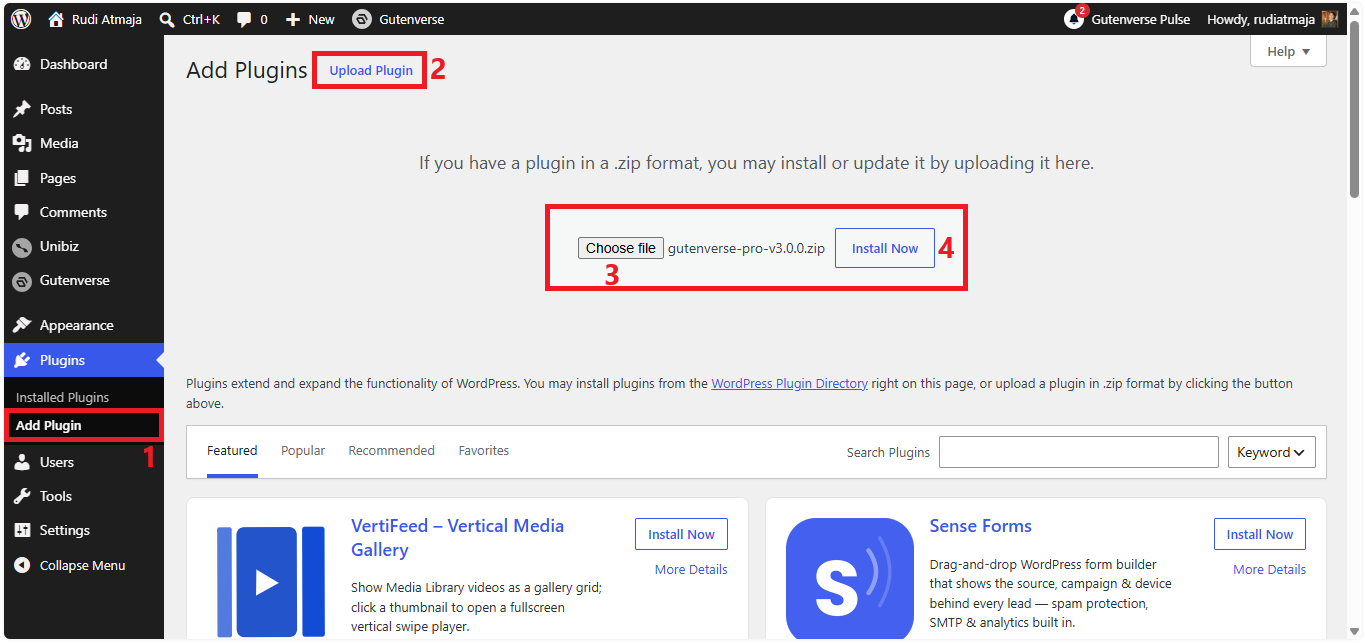
Back in your WordPress dashboard, go to Plugins > Add Plugin, then click Upload Plugin button. Select the Gutenverse Pro ZIP file you downloaded, click Install Now, and wait for WordPress to finish the installation. Once it’s done, click Activate Plugin to enable Gutenverse Pro on your website.
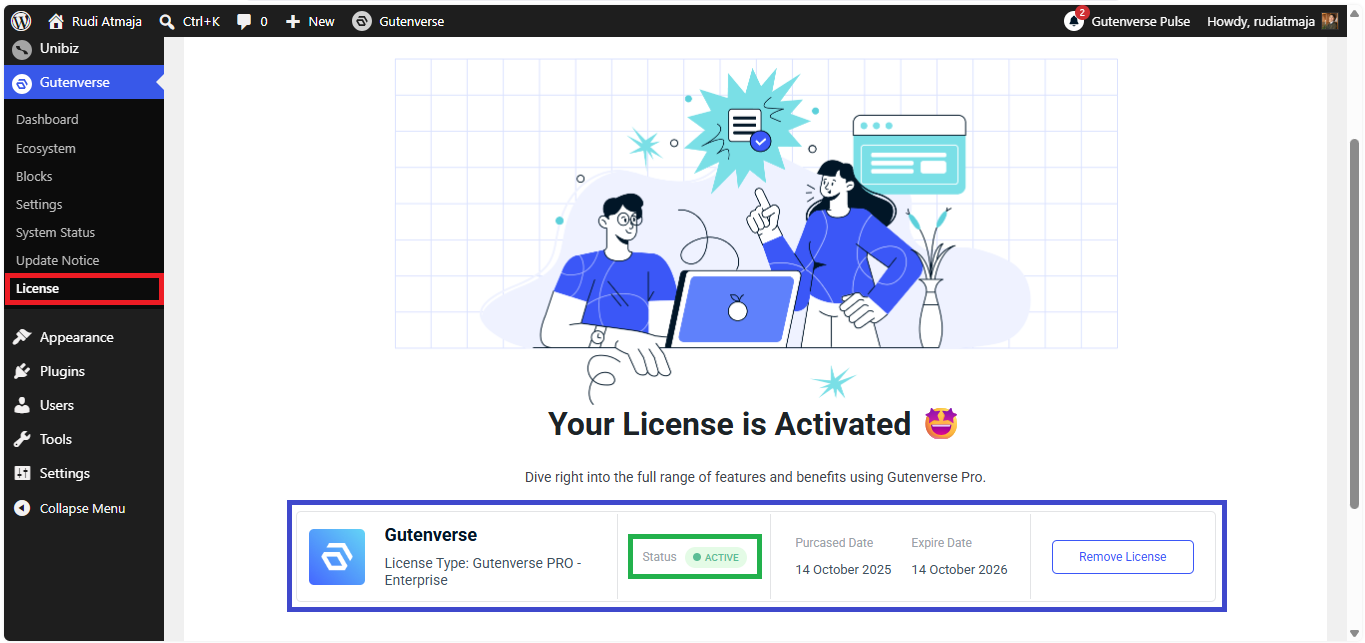
After activating Gutenverse Pro, you can activate your Pro license as well. If you need help with the activation process, follow the official Gutenverse guide, “How to Activate License.” Once your license is active, you’re all set to use the additional Pro features and pre-built resources we’ll need in the next part of this tutorial.
3. Import a Demo
Now that Gutenverse is installed, we can skip a lot of the design work by importing a complete demo. Unibiz comes with a collection of ready-made demos, so instead of building your business website section by section, you can start with a complete design and customize it later. This is especially useful if you want to get your website online quickly.
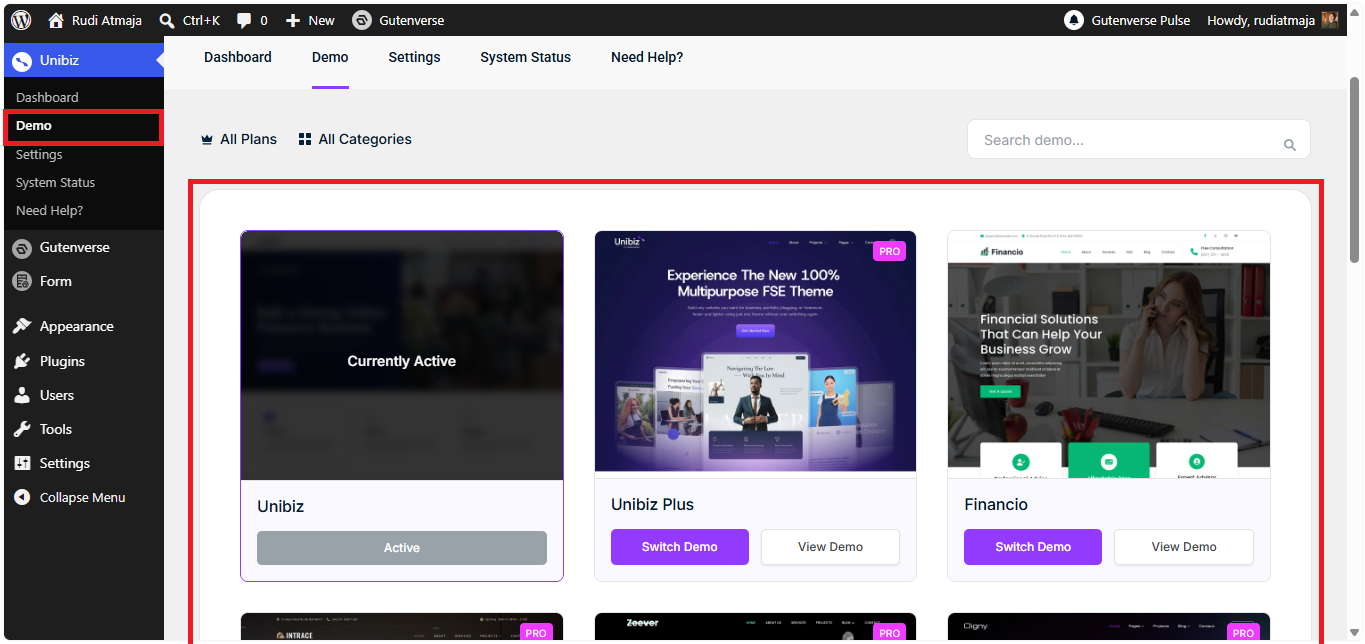
To see the available demos, go to Unibiz > Demo from your WordPress dashboard. You’ll find various demos that you can import directly into your website. If you’re using Gutenverse Pro, you can also import any of the Pro demos available in the library, giving you even more designs to choose from.
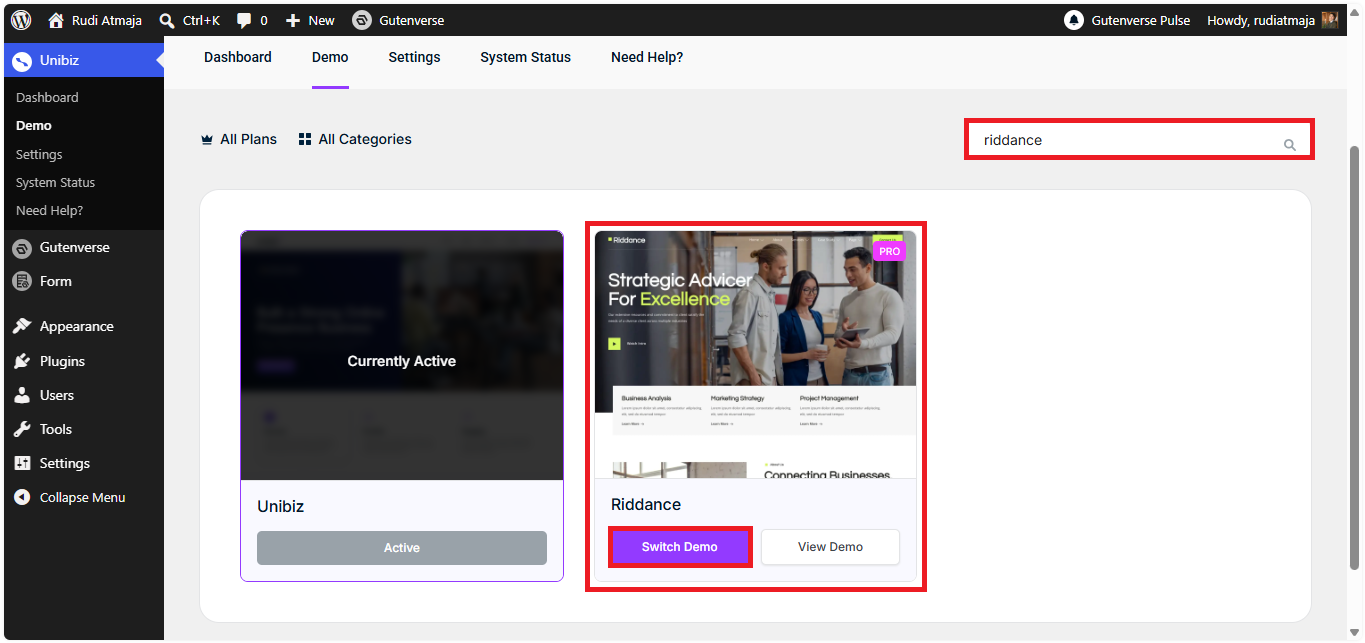
For this tutorial, we’ll use the Riddance demo. If you want to follow the same example, type “Riddance” into the search box to find it. Once the Riddance demo appears, click the “Switch Demo” button inside its demo box.
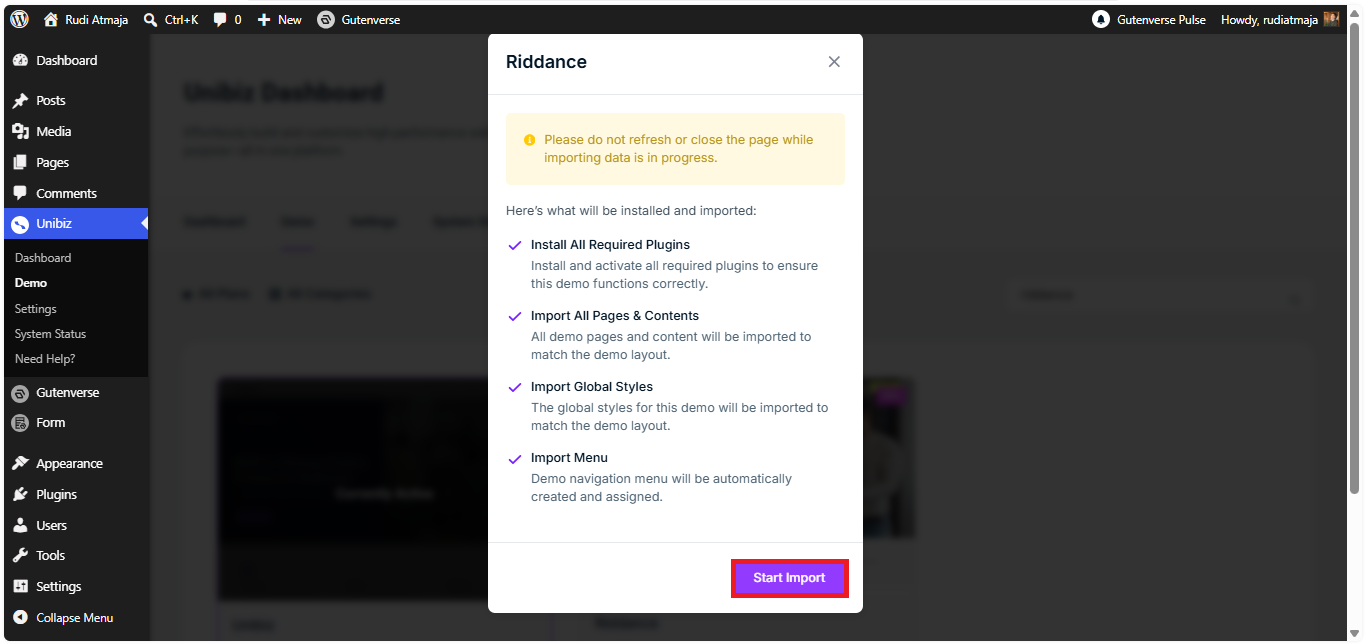
A popup will appear then click “Start Import” to begin the process. WordPress will then start importing the Riddance demo and all of the content and settings included with it.
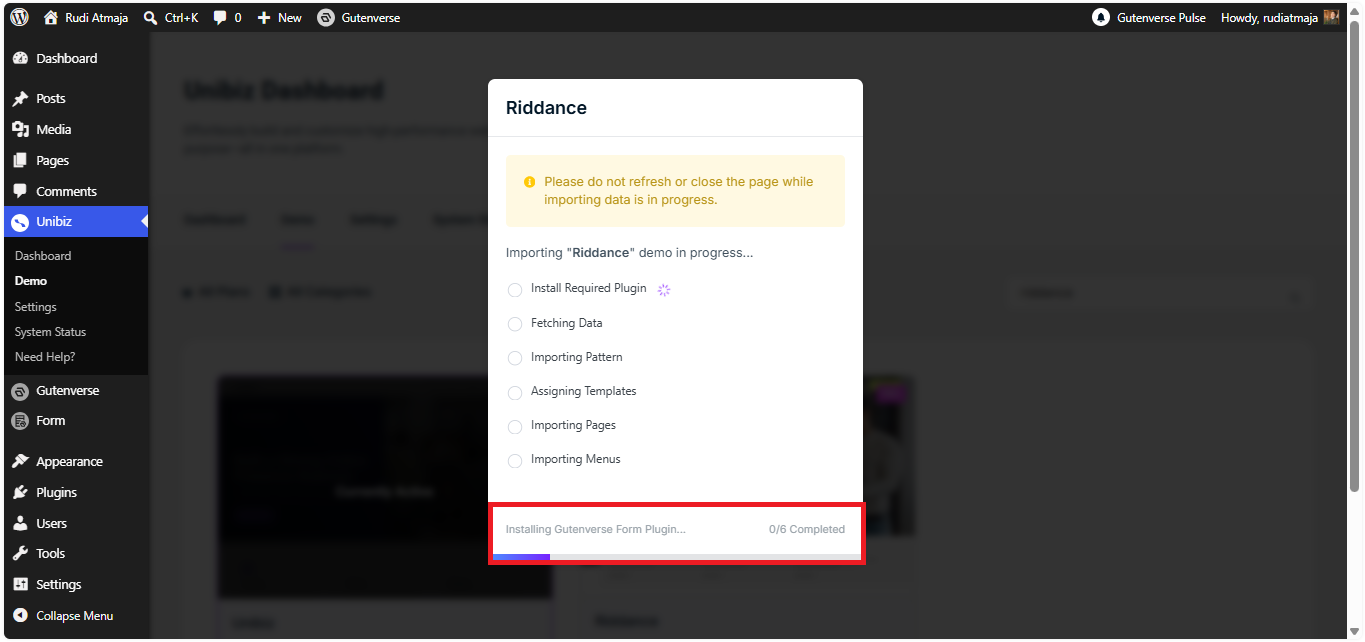
Now, just give it a little time to finish. The import process may take a few moments, so don’t close the page or start clicking around while it’s still working. Once the import is complete, open a new tab in your browser and enter your website’s address.

And there you go! Your website should now be using the Riddance demo instead of the default Unibiz design. You’ve already got the basic look and structure of a professional business website in place, which means we can move on to customizing it and replacing the demo content with your own.
4. Customize the Imported Pages
Now that the Riddance demo is on your website, you don’t need to keep its content exactly as it is. The demo is simply your starting point, and this is where you can replace the placeholder content with your own business information. Let’s start with the Home page and gradually turn the imported design into a website that actually represents your business.
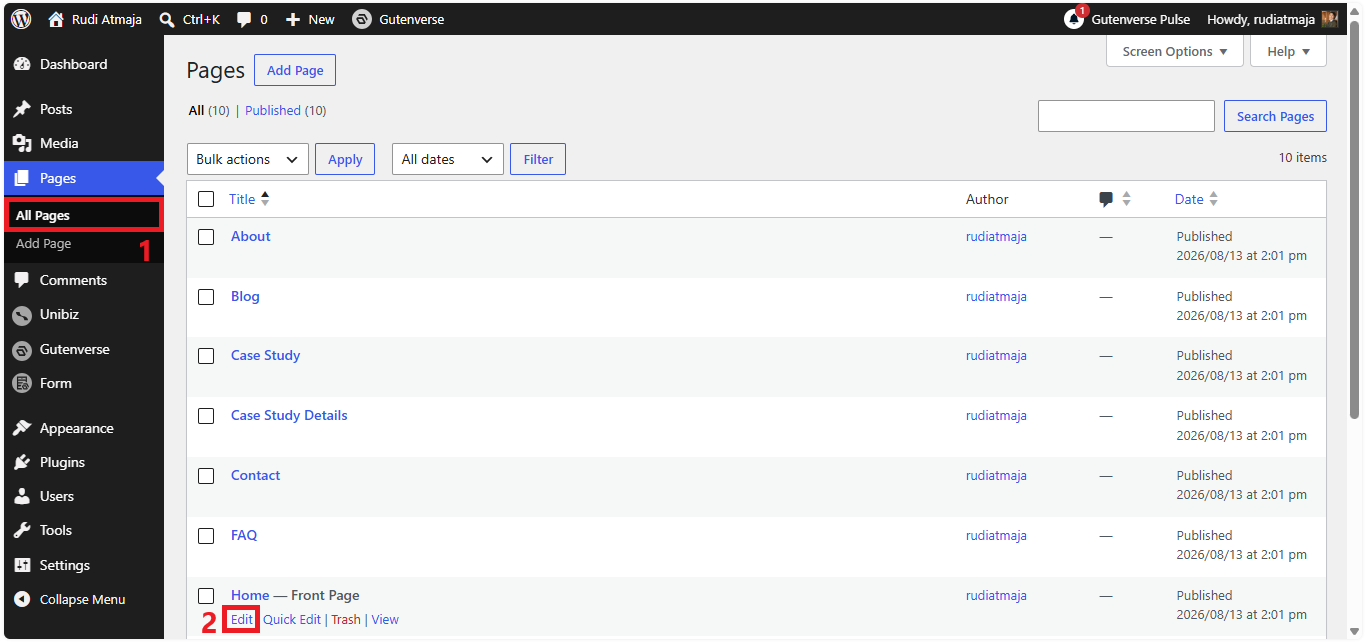
From your WordPress dashboard, go to Pages > All Pages and find the imported Home page. Click Edit to open it in the WordPress block editor. Since the page was imported using Gutenverse, you’ll see the different sections of the homepage arranged as blocks, and you can click on any section to start editing it.
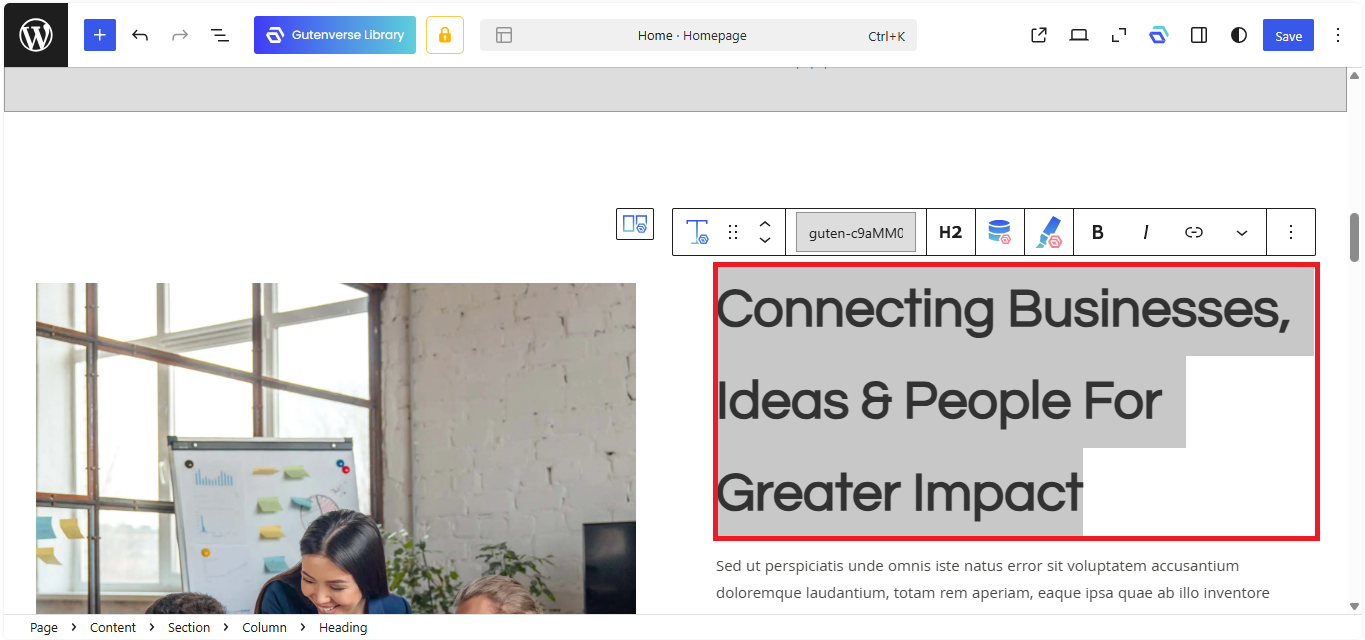
To edit a block, simply click the element you want to change. Depending on the block, you can replace the existing text, change the heading, upload your own image, edit buttons, change links, or adjust other available settings from the block toolbar and the settings panel on the right. For example, if the hero section contains the demo business name and description, click the text and replace it with your own headline and message.
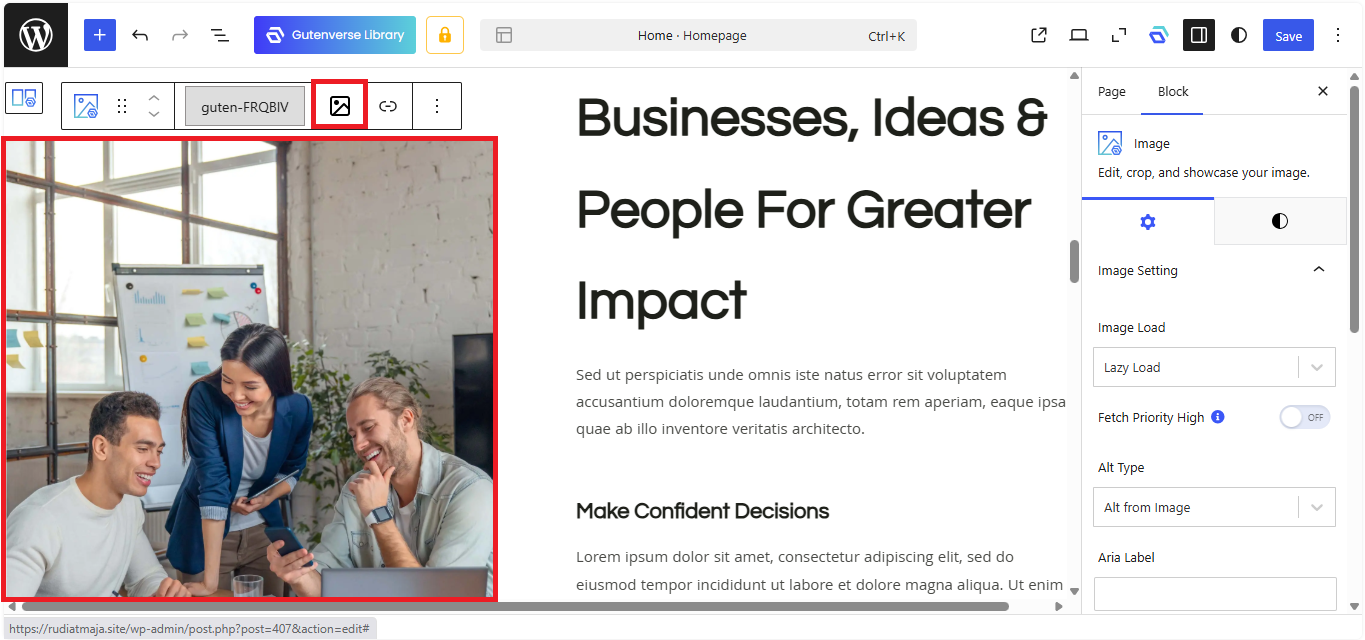
You can also change images without rebuilding the entire section. Click the image you want to replace, choose the option to select or replace the image, and upload an image from your computer or choose one from your WordPress Media Library. This is a simple way to make the imported homepage feel much more like your own business website.
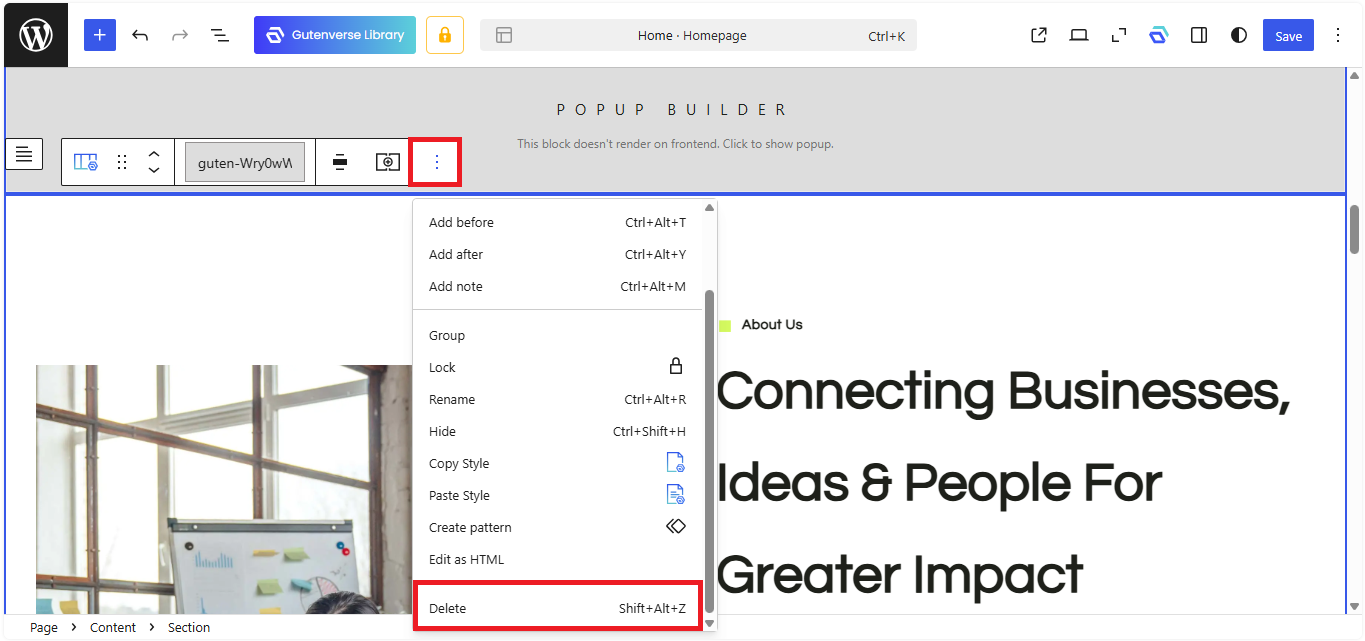
What if there’s a section you don’t need? No problem. Click the block or section you want to remove, open its More options menu from the block toolbar, and choose Delete. You can remove unnecessary sections such as demo testimonials, portfolio items, promotional banners, or other content that doesn’t make sense for your business.
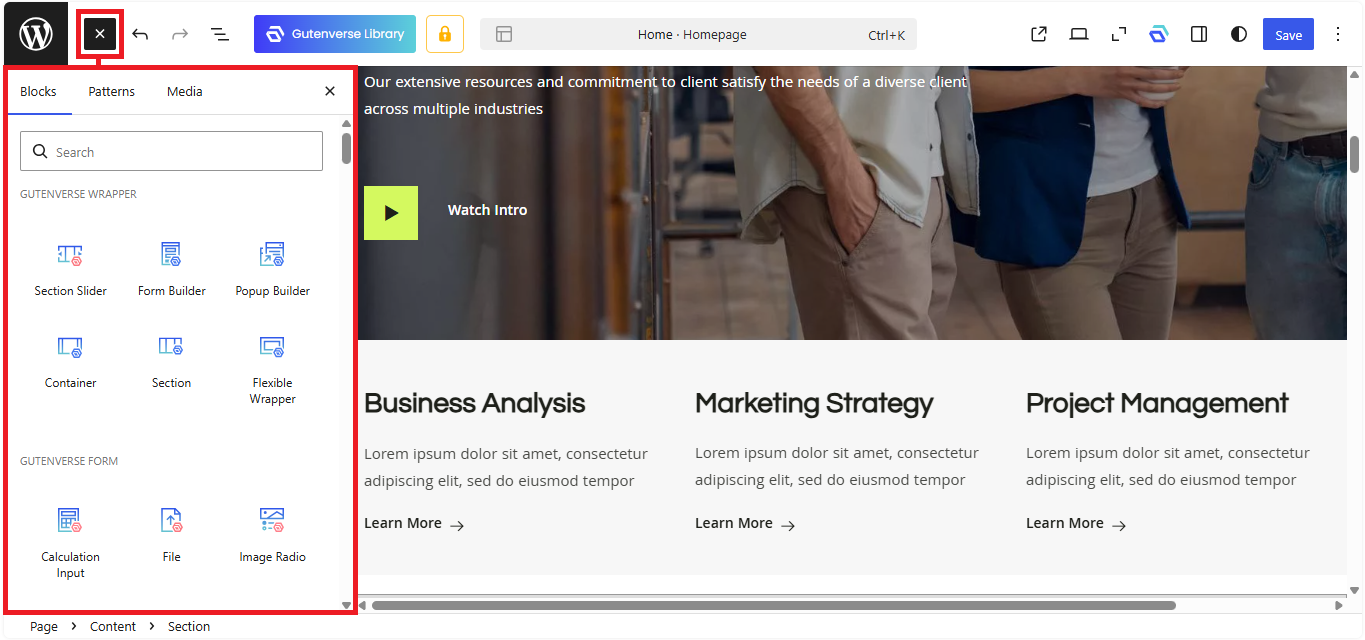
You can also add new sections whenever you need them. Click the + button to open the block inserter, then search for the block you want to use. Gutenverse provides additional blocks and design elements, so you can add things such as headings, buttons, images, forms, services, testimonials, and other sections without having to code them yourself.
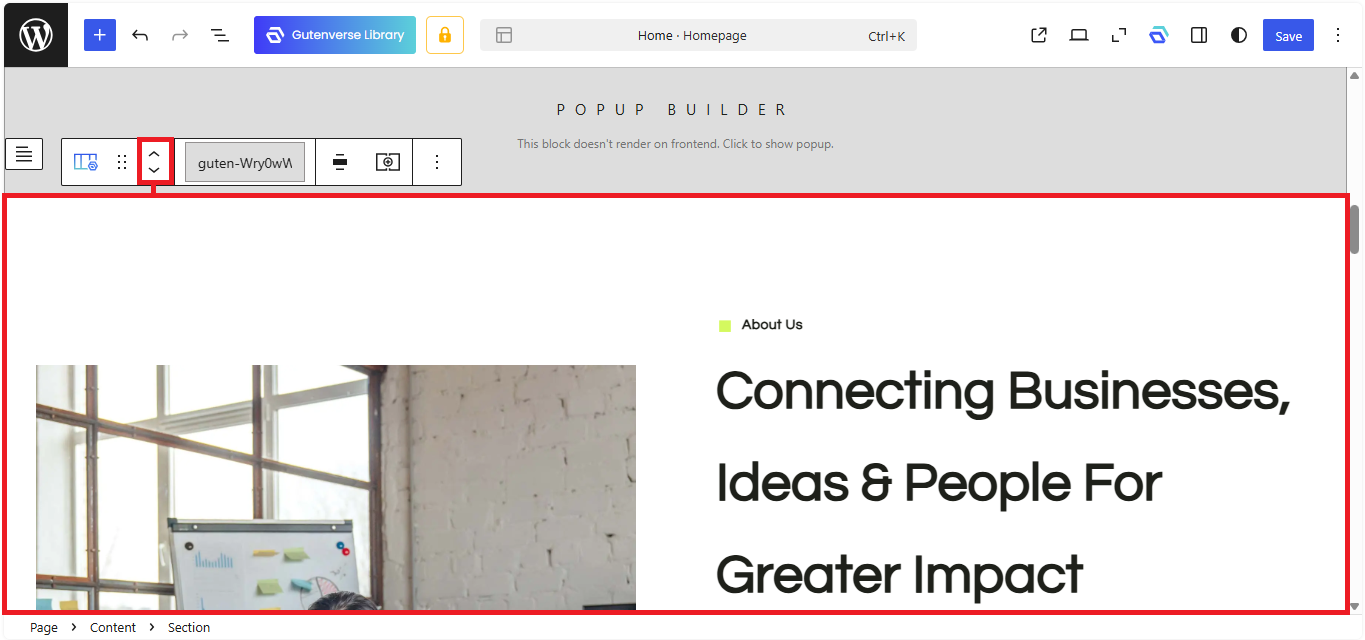
If you want to change the order of sections, you can also move blocks around directly in the editor. Select the section you want to move and use the available move controls to position it higher or lower on the page. This makes it easy to rearrange the homepage until the flow feels right for your visitors.
Don’t feel like you have to customize everything in one go. Start with the most obvious demo content – your business name, headline, images, services, and calls to action – and then work your way through the rest of the page. Once the Home page looks the way you want, you can use the exact same approach to customize the other imported pages, such as About, Services, Case Study, and Contact.
5. Add a New Page
Not every business website needs to use only the pages that come with the imported demo. You may want to add a page for your team, pricing, FAQs, careers, testimonials, or something else that makes sense for your business. Luckily, WordPress makes creating a new page pretty straightforward, and Gutenverse gives you plenty of tools to design it without touching code.
Start from your WordPress dashboard and go to Pages > Add New. You’ll see the WordPress block editor with a blank page waiting for you. Before adding anything else, enter the name of your new page in the title field at the top – for example, “Our Team,” “Pricing,” “FAQ,” or “Careers.”
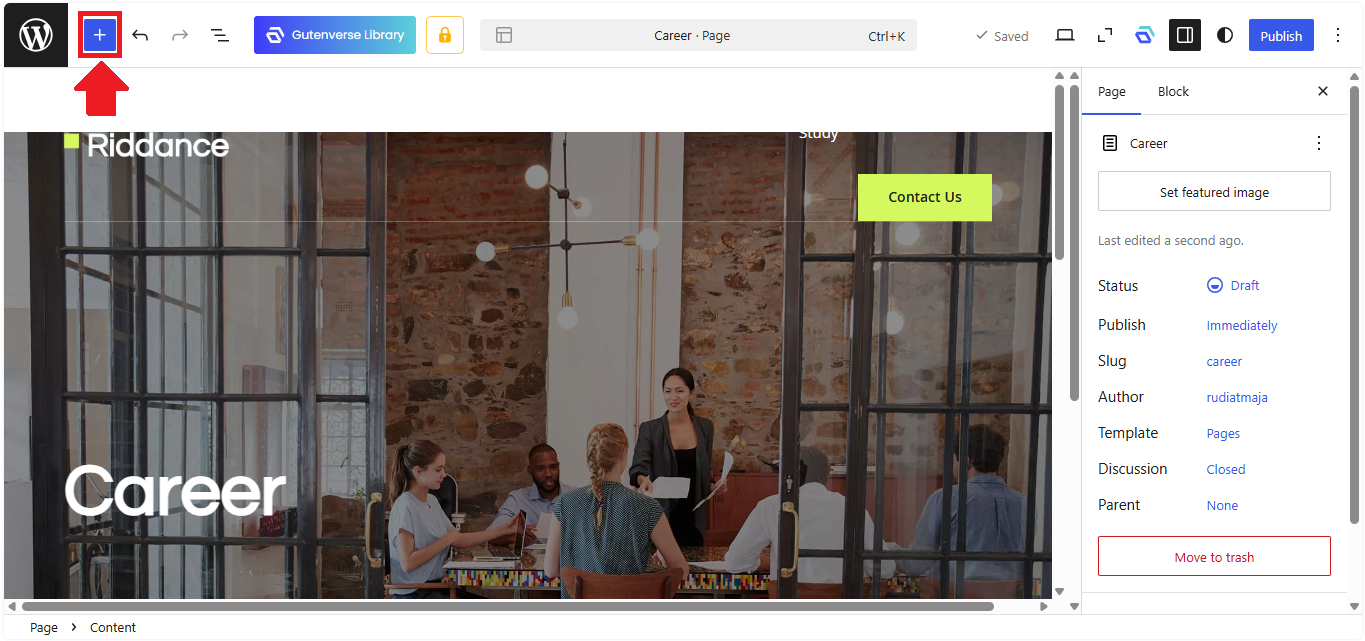
Once you’ve entered the title, you can start building the page by clicking the + button inside the editor. This opens the block inserter, where you can search for the type of content you want to add. You can add basic WordPress blocks such as headings, paragraphs, images, lists, buttons, and columns, as well as Gutenverse blocks available on your website.
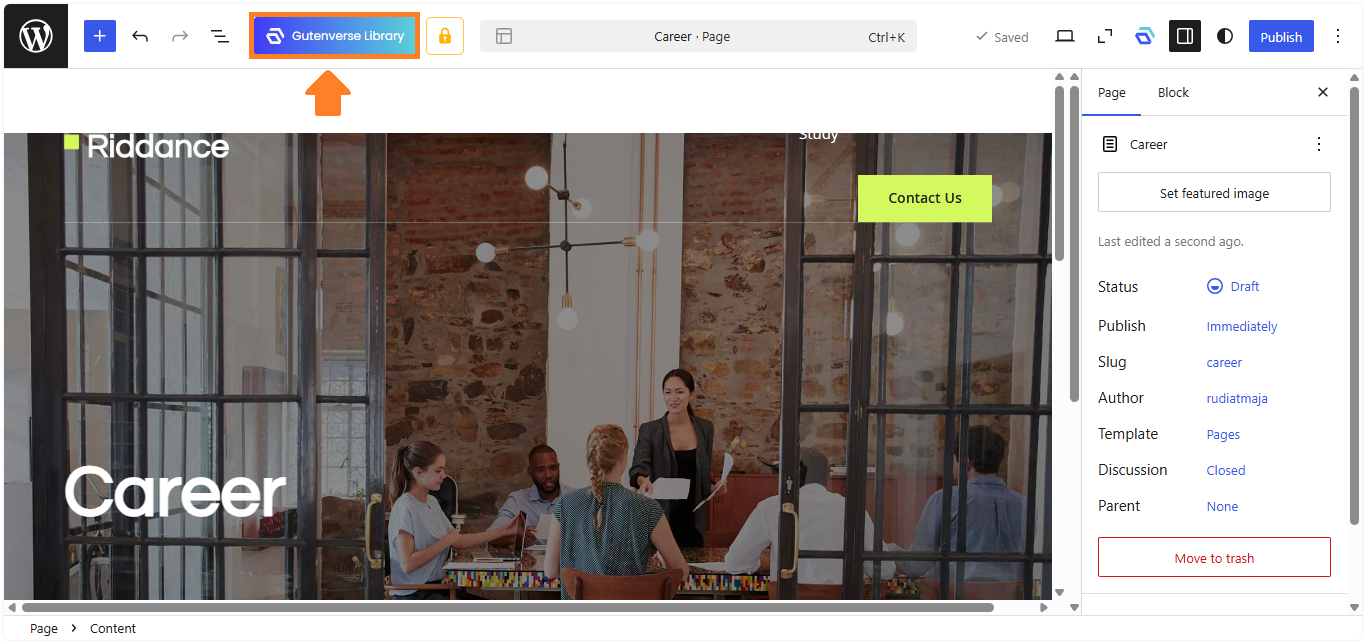
If you don’t want to build the page from an empty canvas, Gutenverse can make things much faster. Click the Gutenverse Library button in the editor to open its collection of ready-made designs. Search through the available templates and choose a layout that fits the purpose of your new page, then import it into the editor and replace the demo content with your own.
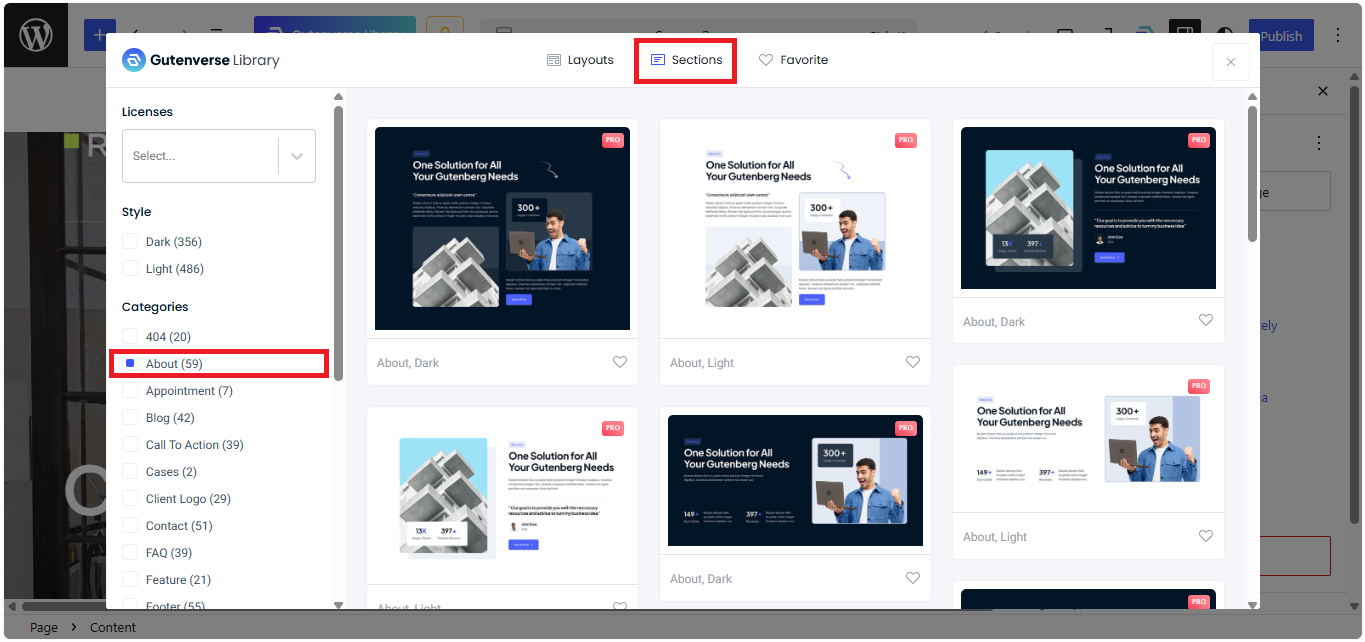
For example, if you’re creating an About Us page, you could start with an existing About template instead of designing every section yourself. Replace the placeholder heading with your company introduction, swap the demo images for your own photos, and update the text to explain your company, team, experience, or values. The same approach works for other pages – you’re simply choosing a starting layout and adapting it to your needs.
If you want to build the page manually, you can add each section one at a time. Start with a heading that tells visitors what the page is about, then add supporting text, images, buttons, or other blocks underneath it. You can continue clicking the + button whenever you want to add another block, and you can select Gutenverse blocks when you need more advanced layouts or design elements.
You can also edit any block after adding it. Click the block you want to change, then use the toolbar that appears above it or the settings panel on the right side of the editor. Depending on the block, you may be able to change its text, alignment, typography, spacing, colors, background, images, links, and other design settings.
Need to remove something? Select the block, open the More options menu from the block toolbar, and click Delete. If you’ve added several blocks and want to change their order, simply select the relevant block and use the move controls to place it higher or lower on the page. This lets you rearrange the entire page until the sections flow naturally.
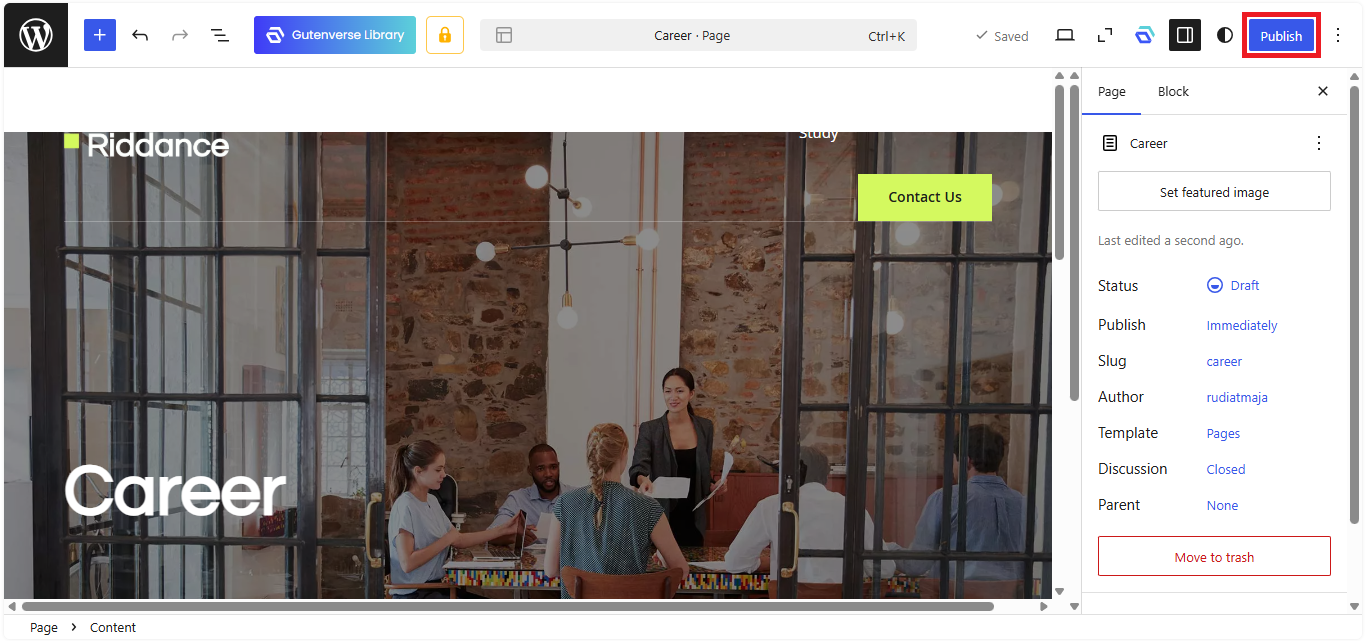
Once the page looks good, take a moment to check the page settings before publishing it. Make sure the title is correct, review the content, and check the page’s URL or permalink so it’s short and easy to understand. If everything looks right, click Publish, then confirm the publishing action if WordPress asks you to.
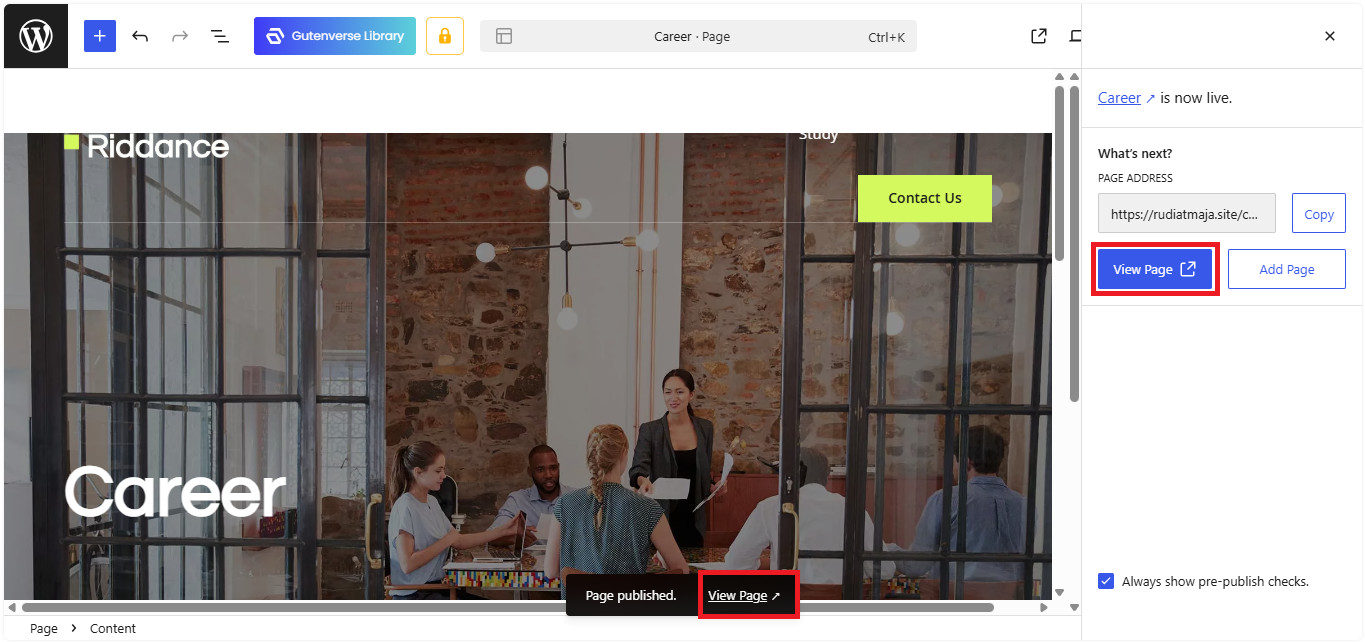
After publishing, click View Page or open the page in a new browser tab to see how it looks on the actual website. Don’t forget to check it on both desktop and mobile views, because a layout that looks great on a large screen may need a few adjustments on smaller screens.
6. Customize the Menu
Your imported Riddance demo already comes with a navigation menu, so you don’t have to start completely from scratch. However, since that menu contains the demo’s pages and links, it’s better to remove it and create a fresh menu using the pages you actually want visitors to see. This also gives you a clean starting point for your own business website.
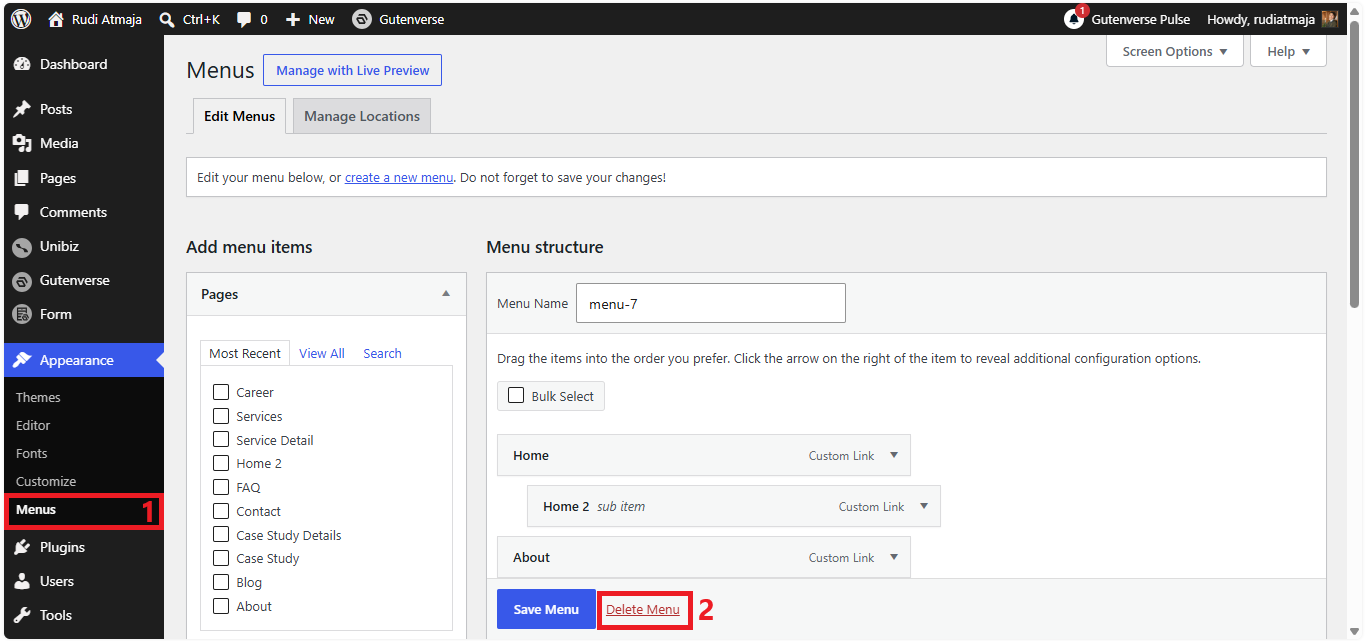
From your WordPress dashboard, go to Appearance > Menus. You’ll see the menu that came with the imported demo, along with its existing menu items. Before adding your own pages, select the existing menu items and remove them so you can rebuild the navigation around your business.
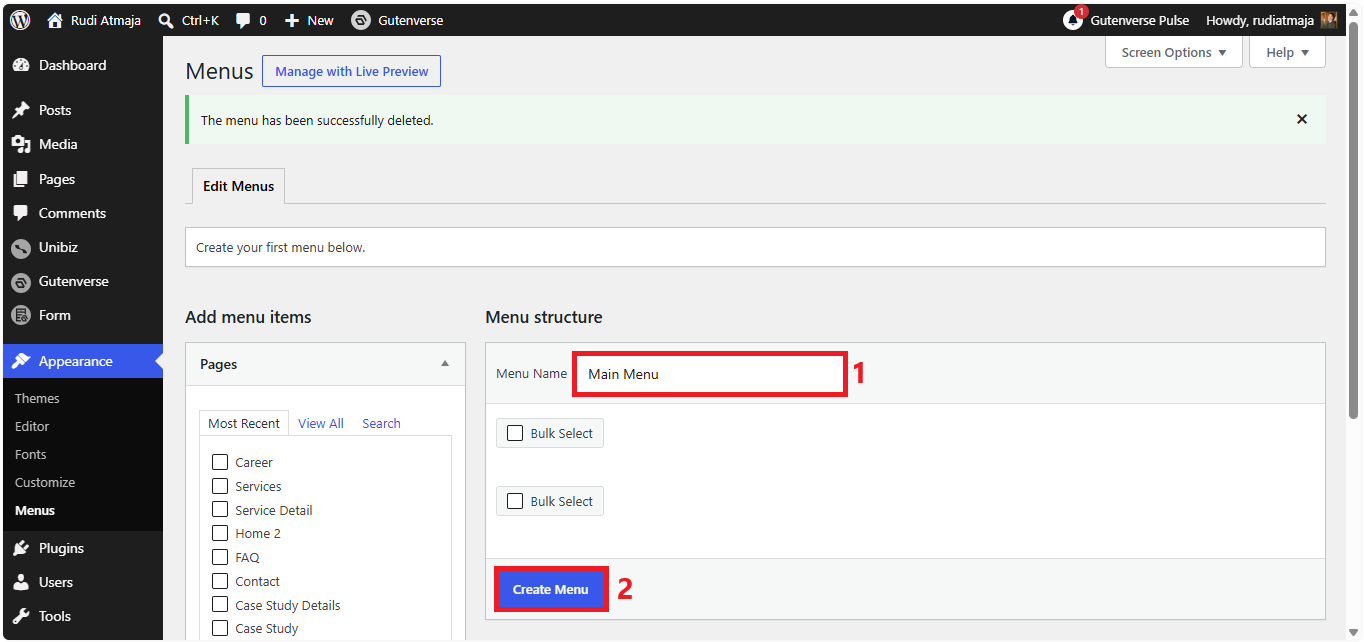
Once you’ve cleared the existing items, create a new menu. Enter a name for it, such as Main Menu or Primary Menu, then click Create Menu. The name is only for identifying the menu inside WordPress, so you can use whatever name makes sense to you.
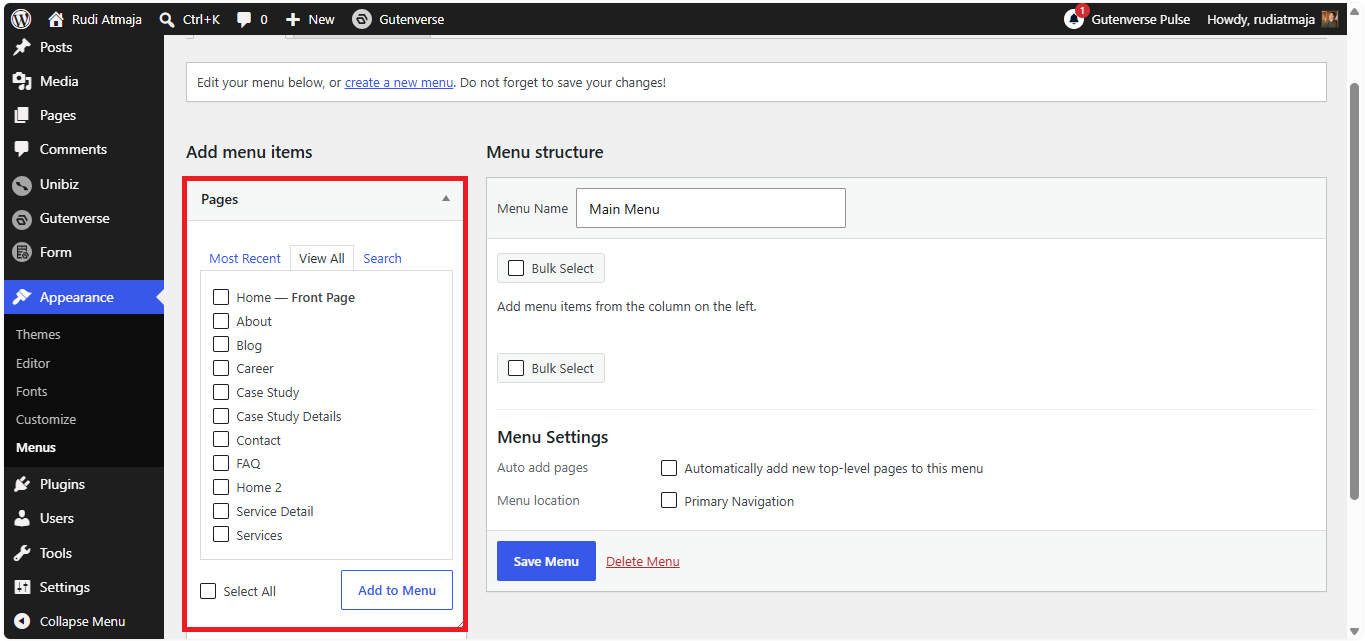
Now it’s time to add the pages you want visitors to access from the main navigation. On the left side of the screen, you’ll find your available pages. Select the pages you want to include, such as Home, About, Services, Case Study, and Contact, then click Add to Menu. WordPress will add them to your new menu, and you can rearrange them into whatever order you prefer.
To change the order, simply drag and drop the menu items into position. You can also create dropdown menus by dragging one item slightly underneath another item and positioning it as a sub-item. For example, if your business offers several services, you could place individual service pages under a main Services menu item.
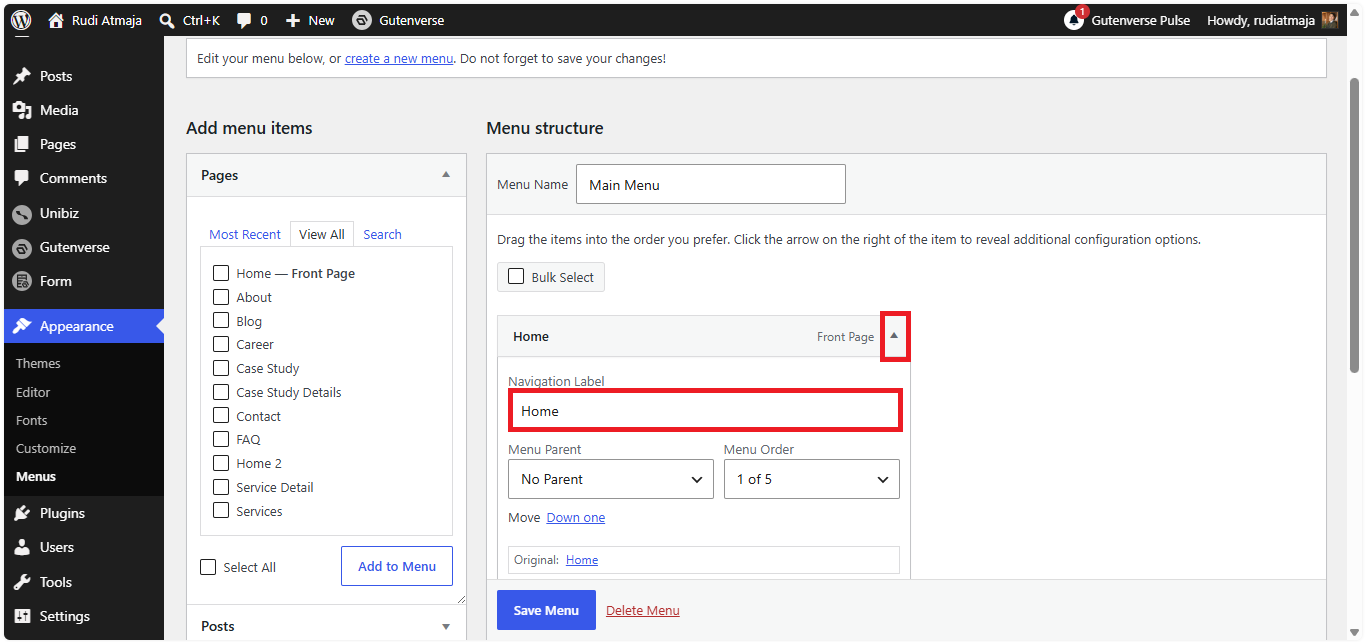
You can also change how a menu item is displayed. Click the small arrow on a menu item to expand its settings, then edit the Navigation Label if you want the menu text to be different from the actual page title. For example, a page titled “About Our Company” could simply appear as “About” in the navigation.
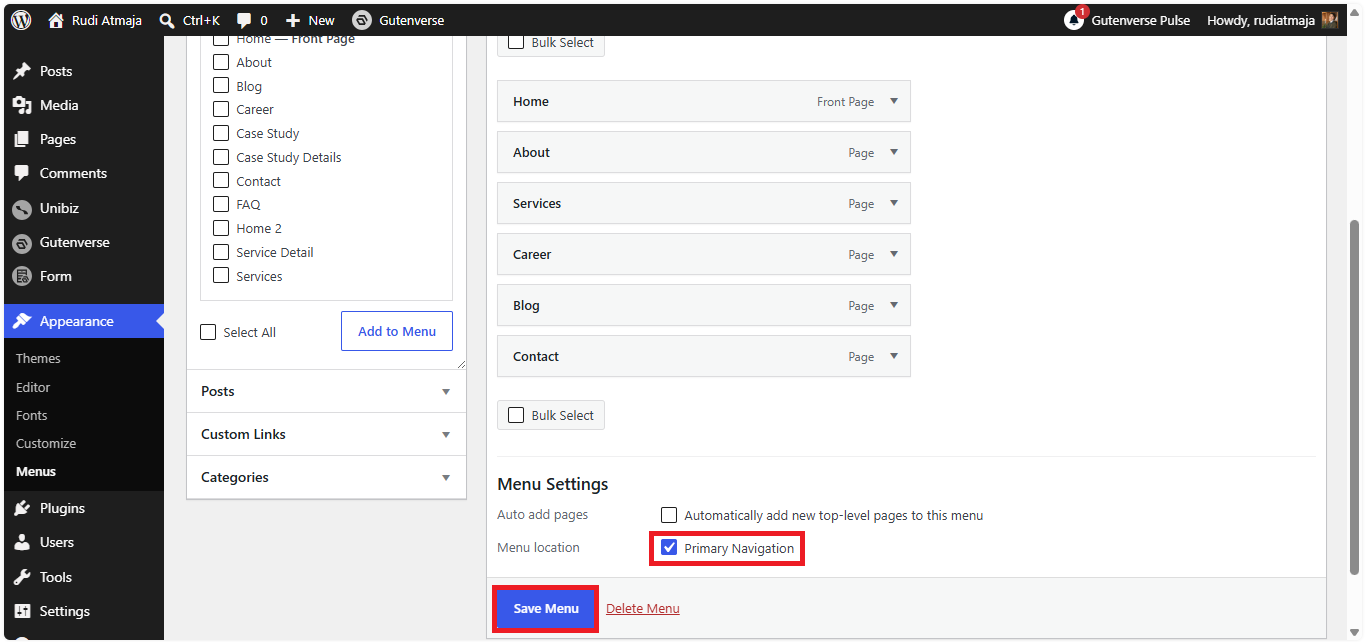
When everything looks right, scroll down to the menu settings and choose where the menu should appear. Select the appropriate display location as the Primary Navigation. Finally, click Save Menu to save your changes.
Now open your website in a new browser tab and check the navigation. Click each menu item to make sure it points to the correct page, and test any dropdown menus you’ve created. If something feels out of place, simply return to Appearance > Menus, make your changes, and save the menu again.
7. Customize the Header and Footer
Your header and footer are two of the most important parts of your website because they appear across multiple pages. The header is where visitors usually find your logo, main navigation, and important buttons, while the footer can provide additional links, contact details, social media, and other useful information. Since the Riddance demo already includes both, we can simply customize them instead of building everything from scratch.
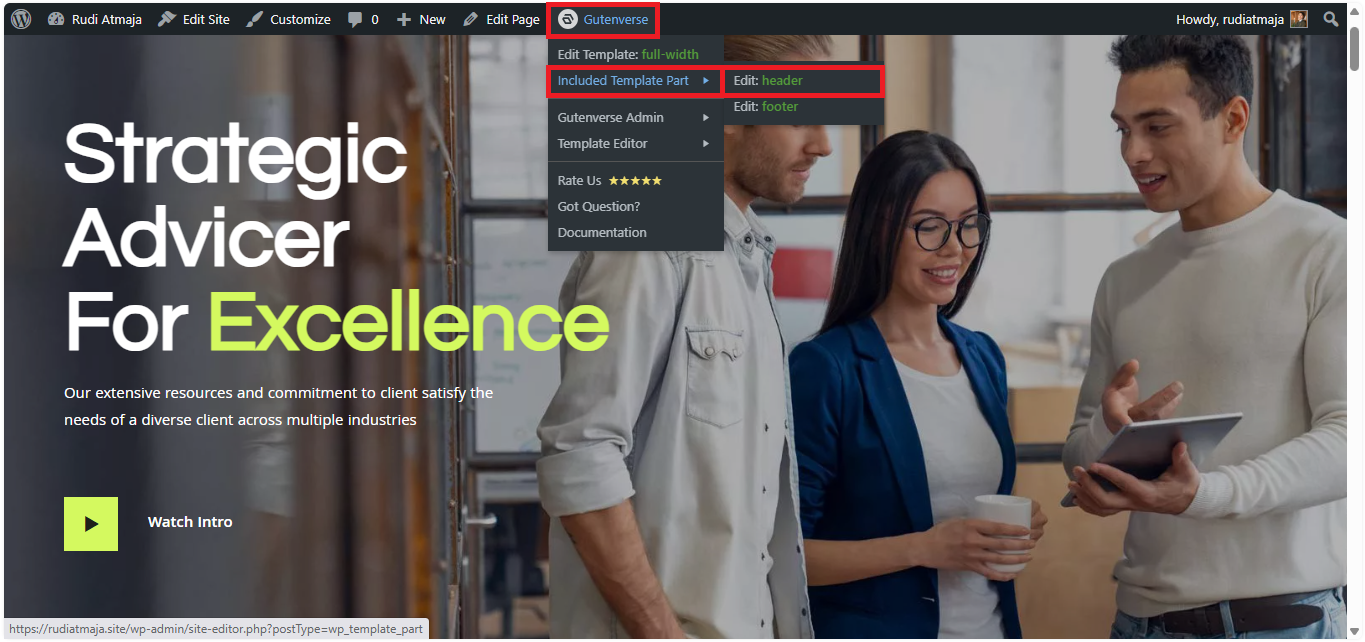
To edit the header, start from your Home page in the WordPress editor. Click the Gutenverse icon to open the Gutenverse options, then find Included Template Part. From there, select Edit: Header to open the header template for editing.
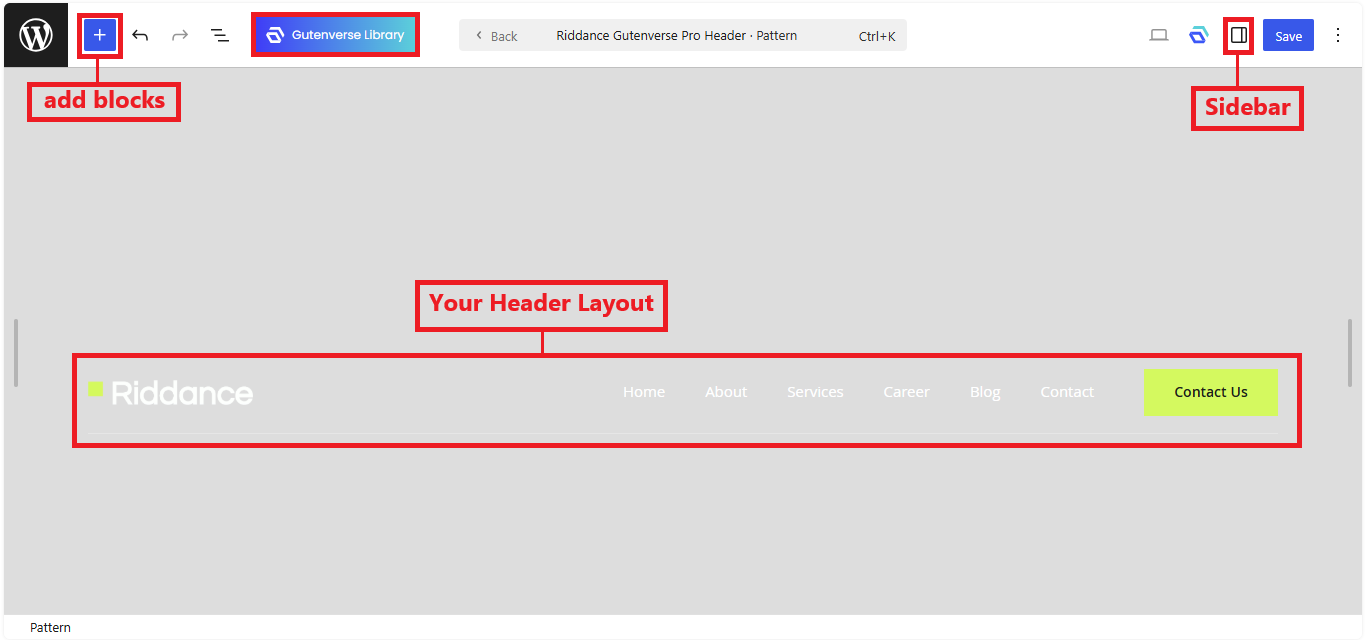
Once the header is open, you can edit its individual blocks just like you edited the blocks on the homepage. Click the logo to replace it with your own business logo, select the navigation to adjust the menu if necessary, and edit any text, buttons, or other elements included in the demo header. You can also change the styling of individual blocks through the available Gutenverse settings.
If you want to remove something from the header, simply select the block you don’t need and delete it. You can also add new blocks using the + button if you want to include something that isn’t already there, such as a phone number, call-to-action button, social media links, or another useful element.
Once you’re happy with the header, make sure to save your changes. Because you’re editing the header template part rather than a single page, the changes will apply wherever this header is used across your website. That means you don’t have to manually recreate the same header on every page.
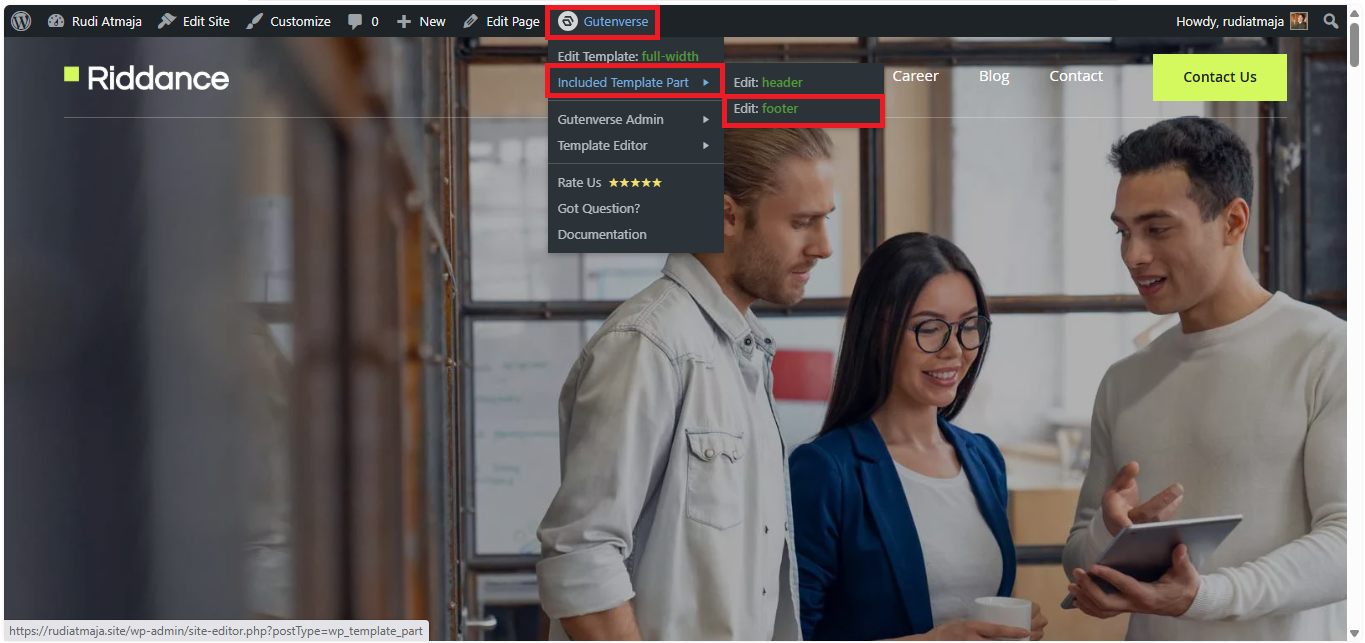
Now let’s do the same thing with the footer. Return to the Home page, click the Gutenverse icon, open Included Template Part, and choose Edit: Footer. This will take you to the footer template, where you can replace the demo content with your own business information.
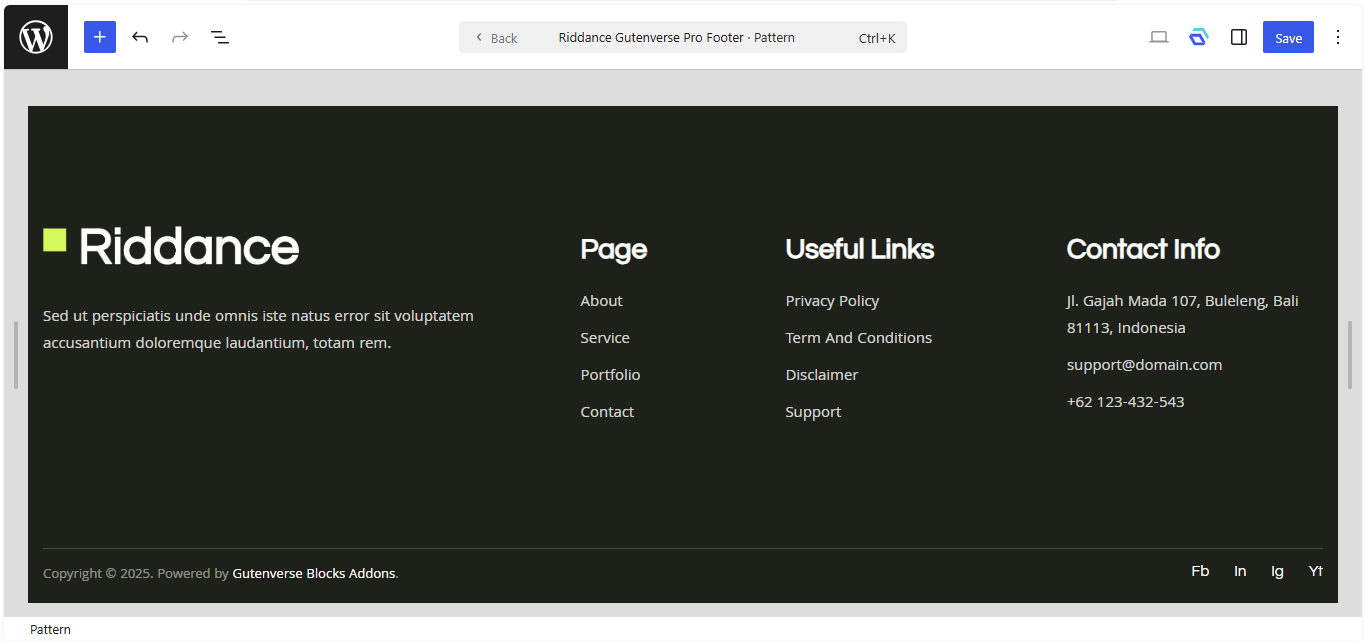
You can update the footer by replacing the existing text, links, images, contact information, and other blocks. You can also delete sections you don’t need or add new Gutenverse blocks if you want to include additional information. For example, you might want to add your business address, contact details, important page links, social media accounts, or a simple copyright notice.
When you’ve finished customizing the footer, save your changes and return to your website. Open a few different pages to make sure the header and footer look consistent throughout the site. Once they’re set up properly, you’ll have a consistent navigation and branding experience across your entire business website.
8. Delete Unnecessary Pages and Posts
After importing the Riddance demo, you may notice that your WordPress dashboard is now filled with pages and posts that you don’t actually need. That’s completely normal—the demo is designed to give you a complete website structure, so it may include pages, blog posts, and other content that don’t fit your business. Before you move on, it’s a good idea to clean things up and keep only what you actually plan to use.
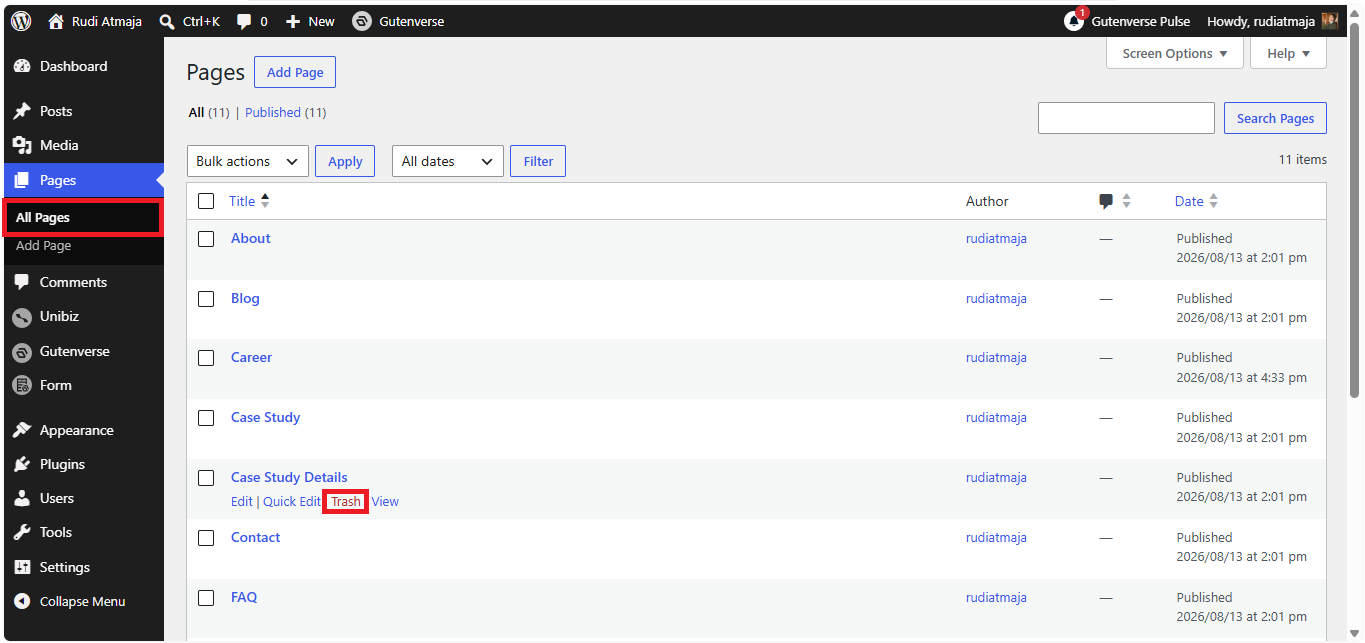
Let’s start with the pages. From your WordPress dashboard, go to Pages > All Pages and look through the list. You’ll probably find several imported pages, such as About, Services, Case Study, Contact, and other demo pages, along with any pages that were already included in your WordPress installation.
If you find a page that you don’t need, hover over its title and click Trash. You can repeat this for every unnecessary page, but take a moment to make sure the page isn’t being used somewhere else first. For example, don’t delete a page that you’ve already added to your main navigation or linked to from another important section of your website.
You may also find duplicate pages or pages created during the demo import that you don’t intend to use. If you already have the pages you need, there’s no reason to keep multiple versions sitting in your dashboard. Removing them will make your WordPress installation much easier to manage later.
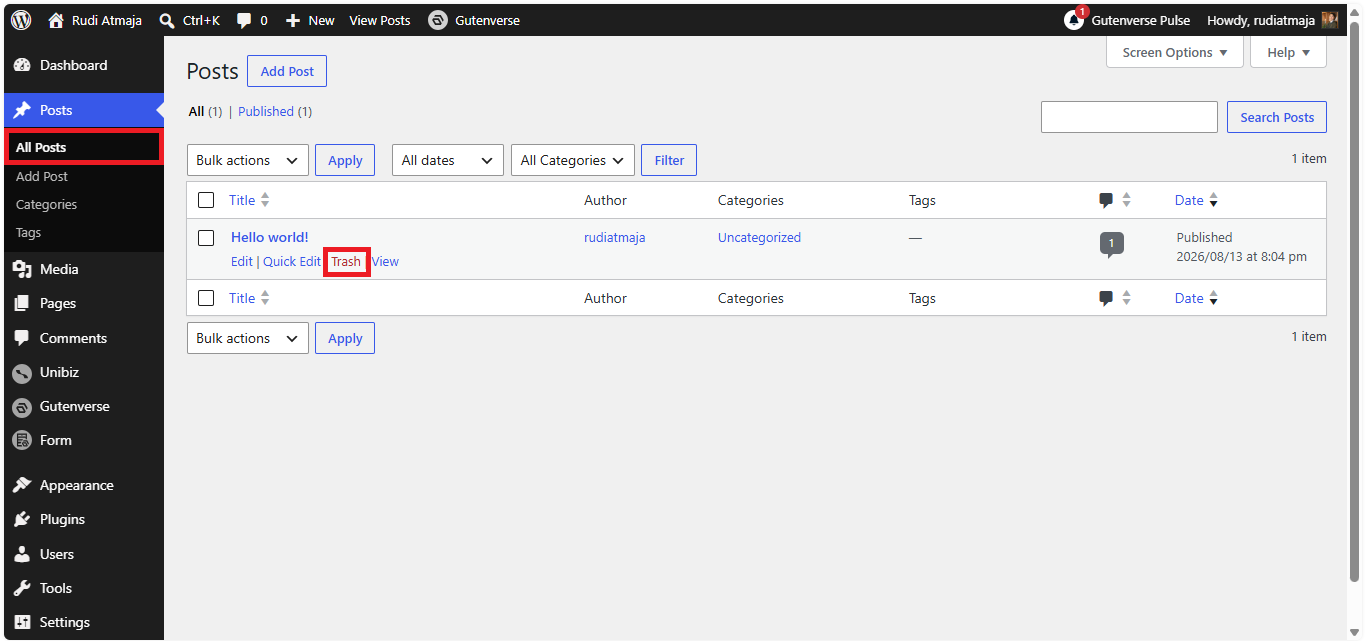
Next, let’s clean up the posts. Go to Posts > All Posts and review the imported content. If the Riddance demo added sample blog posts that aren’t relevant to your business, hover over each unnecessary post and click Trash.
You can also remove any default WordPress posts you don’t need, such as the default “Hello world!” post. If you’re planning to use the blog section for your business, keep the posts you actually want and remove only the demo or placeholder content.
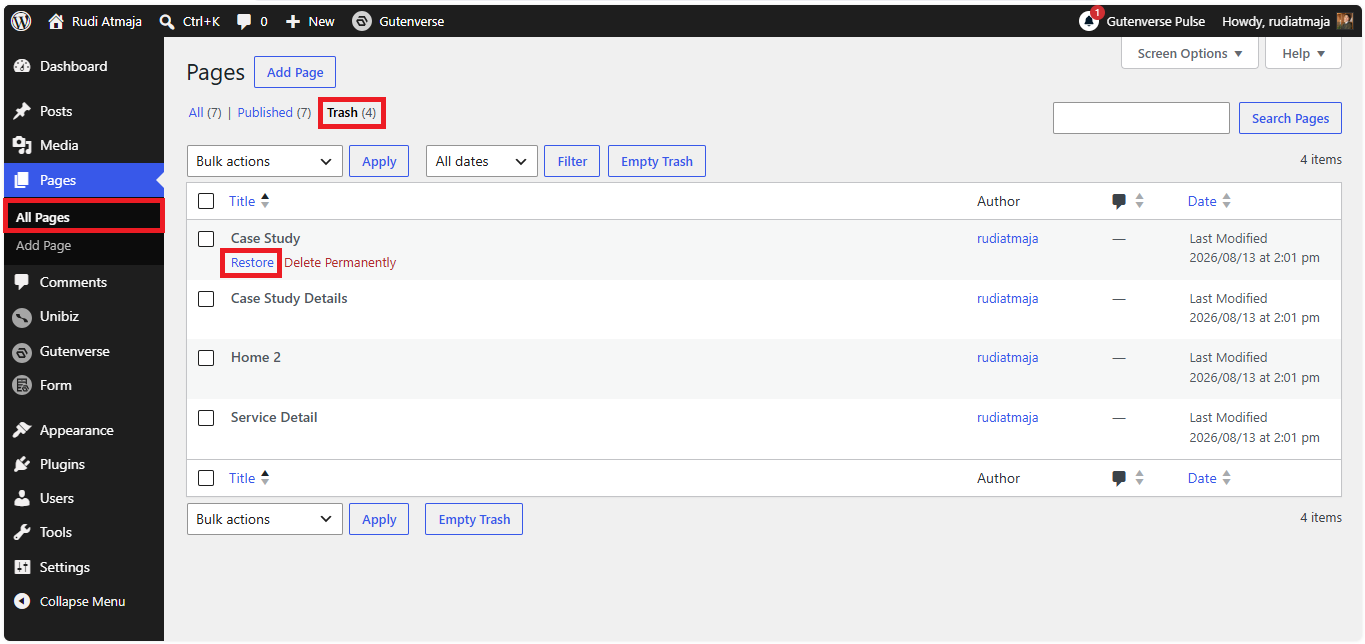
If you accidentally move something to the Trash, don’t panic. WordPress doesn’t immediately delete it permanently. You can open the Trash section for Pages or Posts, review the items you removed, and restore anything you deleted by mistake.
Once you’ve finished cleaning everything up, your dashboard should contain only the pages and posts that actually belong to your website. This might seem like a small step, but it makes the rest of your WordPress setup much cleaner – and it saves you from accidentally editing or linking to demo content later.
9. Create Blog Posts
Now that your main pages are in place, it’s a good idea to give your business website something new to say from time to time. Publishing blog posts regularly can help you share useful information, answer common customer questions, show your expertise, and give people more reasons to visit your website. It can also help your website stay active instead of looking like it was built once and then forgotten.
Blogging can also support your search visibility. Every useful post gives you another opportunity to target relevant search terms, answer questions your potential customers are already searching for, and bring new visitors to your website. You don’t need to publish something every single day, either – focus on creating genuinely useful content on a consistent schedule.
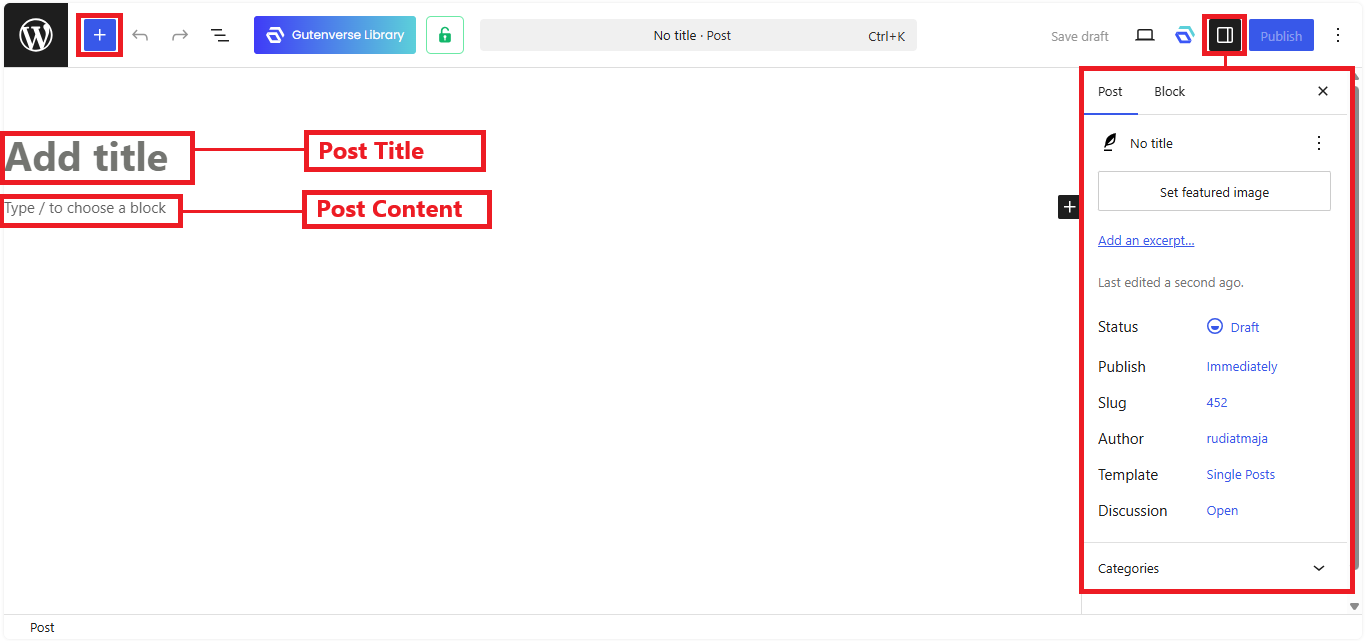
To create a new post, go to Posts > Add New from your WordPress dashboard. Add your post title, write your content using the WordPress editor, and use the available blocks to add headings, images, links, lists, buttons, or other elements that make the article easier to read. When you’re happy with the content, choose a category, add a featured image if needed, review the post settings, and click Publish.
For SEO, I recommend installing Rank Math SEO to help optimize your blog posts and other important content across your website. It gives you useful tools for working with focus keywords, SEO titles, meta descriptions, schema, links, and other SEO settings without requiring you to become an SEO expert first.
The key is to think about your blog as a useful resource for your potential customers, not just an SEO trick. Write about problems they actually have, questions they frequently ask, and topics related to the products or services you offer. Do that consistently, optimize each post properly, and your blog can become a valuable part of your overall business website strategy.
Your Business Website Is Ready to Go
And that’s it – you’ve now gone from a blank WordPress installation to a complete business website without writing a single line of code. You’ve installed the theme, added Gutenverse, imported a ready-made demo, customized the pages, set up the menu, adjusted the header and footer, and cleaned out the content you don’t need.
The best part is that you don’t have to stop here. Your website can keep growing as your business grows, whether you want to add new pages, publish useful blog posts, improve your SEO, or introduce new services and features. The more you learn about WordPress and Gutenverse, the more you’ll be able to fine-tune the website and make it truly your own.
So, if you’ve been putting off creating a business website because you thought you needed coding skills, hopefully this guide has changed your mind. With WordPress.org, a suitable theme, and the right tools, you can build a professional-looking website yourself and get it online without turning the process into a technical nightmare. Now it’s your turn – start customizing, publish your site, and get your business in front of more people.