


Want to add a new feature to your WordPress website without touching a single line of code? That’s exactly where plugins come in. From improving your SEO and adding contact forms to boosting security or turning your site into an online store, plugins can do a lot of the heavy lifting for you. And if you’re using WordPress.org, installing one is usually much easier than you might expect.
If you’re completely new to WordPress.org, don’t worry – you’re not alone. Before jumping into plugins, you might want to check out our guide, “What is WordPress.org”, where we explain what WordPress.org is, how it works, and what you need to run your own self-hosted website. Once you’ve got the basics down, the whole plugin thing will make a lot more sense.
One of the fun parts of using WordPress.org is having tons of plugins to choose from. You can grab free plugins from the official WordPress.org Plugin Directory, buy premium plugins from developers, or upload a plugin ZIP file you’ve downloaded from another trusted source. In other words, if you need your website to do something new, there’s a pretty good chance you’ll find a plugin for it.
Still deciding between WordPress.org and WordPress.com? We’ve got you covered there, too. Check out our “What is WordPress.com” article if you want to understand how WordPress.com works and how it compares with WordPress.org, especially when it comes to hosting, flexibility, and managing plugins. Knowing the difference can save you a lot of confusion later.
Now, before you go wild installing every plugin that looks interesting, there’s a little housekeeping to keep in mind. You don’t need five different plugins doing essentially the same job, and you probably don’t need a plugin for every tiny feature either. Too many plugins can make your site harder to manage, increase the chances of conflicts, and potentially affect your website’s performance, so it pays to be selective.
Ready to install your first plugin? Great! In the sections below, we’ll walk you through the process step by step, starting with the easiest method and then moving on to uploading plugin files from your computer. By the end, you’ll know exactly where to find plugins, how to install and activate them, and how to get them ready to work on your website.
Method One: Install a Free Plugin
Looking for a free plugin from the official WordPress.org Plugin Directory? This is the first method you’ll want to try. WordPress makes it incredibly easy to browse thousands of free plugins and install them directly from your website dashboard, so there’s no need to download plugin files manually.
This method is great when you want to add a new feature to your website without spending money on a premium plugin. Whether you’re looking for an SEO plugin, a contact form, a security tool, a performance booster, or something completely different, you’ll find plenty of free options in the official WordPress.org repository.
1. Log In to Your WordPress.org Site Dashboard
Ready to start installing your plugin? First, you need to get into your WordPress dashboard, where you can control almost everything on your site. Think of it as the control room for your website, from managing content to installing plugins and changing settings.
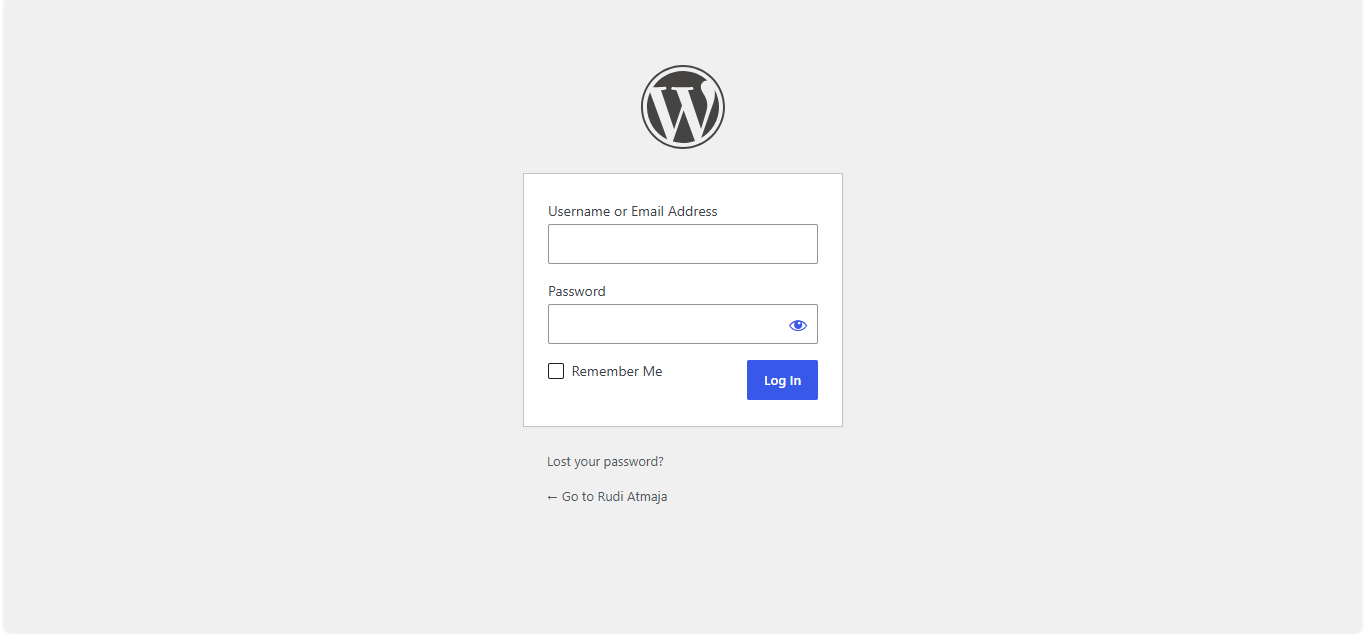
To open the login page, go to yourdomain.com/wp-admin in your browser. Replace yourdomain.com with your actual domain name so WordPress knows which site you want to access. Once the login page appears, you are ready to enter your credentials.
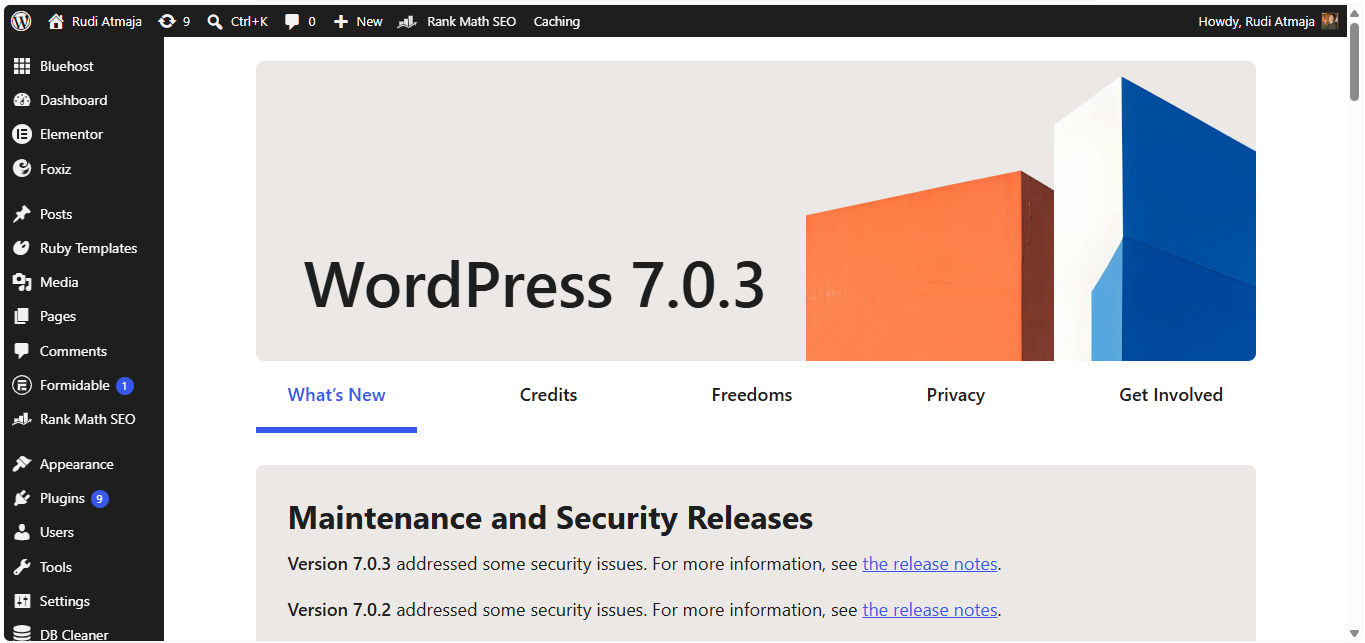
Enter the username or email address and password you use to manage your WordPress site. Then, click Log In and wait a moment while WordPress checks your credentials. If everything is correct, you will be taken straight to your WordPress site dashboard.
2. Find the Plugin You Want to Install
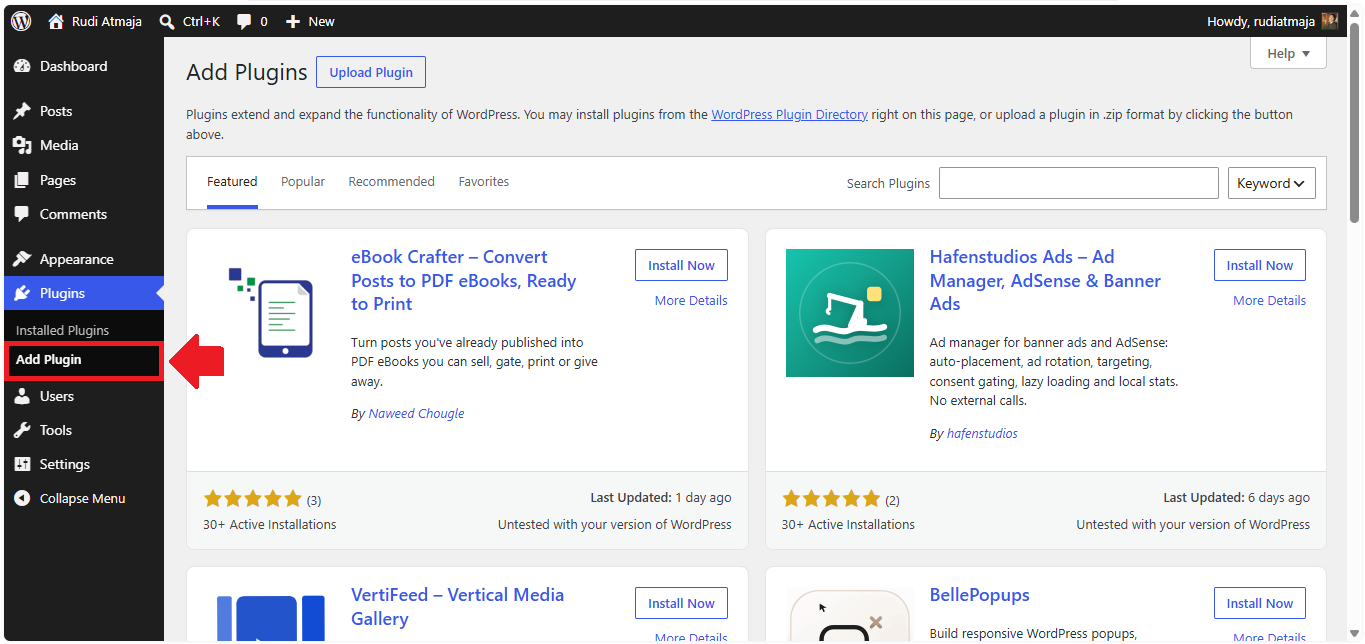
Now that you are inside your WordPress dashboard, it is time to find the plugin you want to install. From the left-hand menu, click Plugins, then select Add Plugin to open the plugin directory. This is where you can search through the available plugins and find the one that matches what you need.
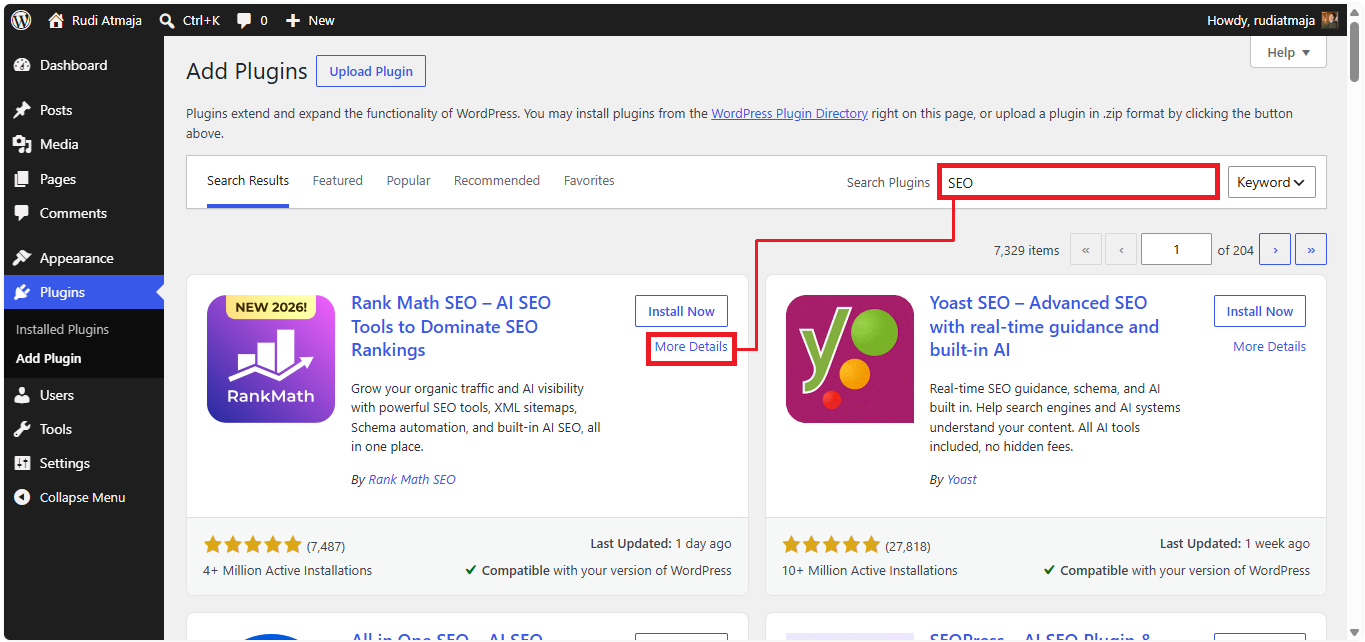
In the search box, type a relevant keyword based on what you are looking for. You can enter the plugin’s name directly, or use keywords that describe the function you want, such as SEO, caching, security, or contact forms. WordPress will then display a list of plugins that may match your search.
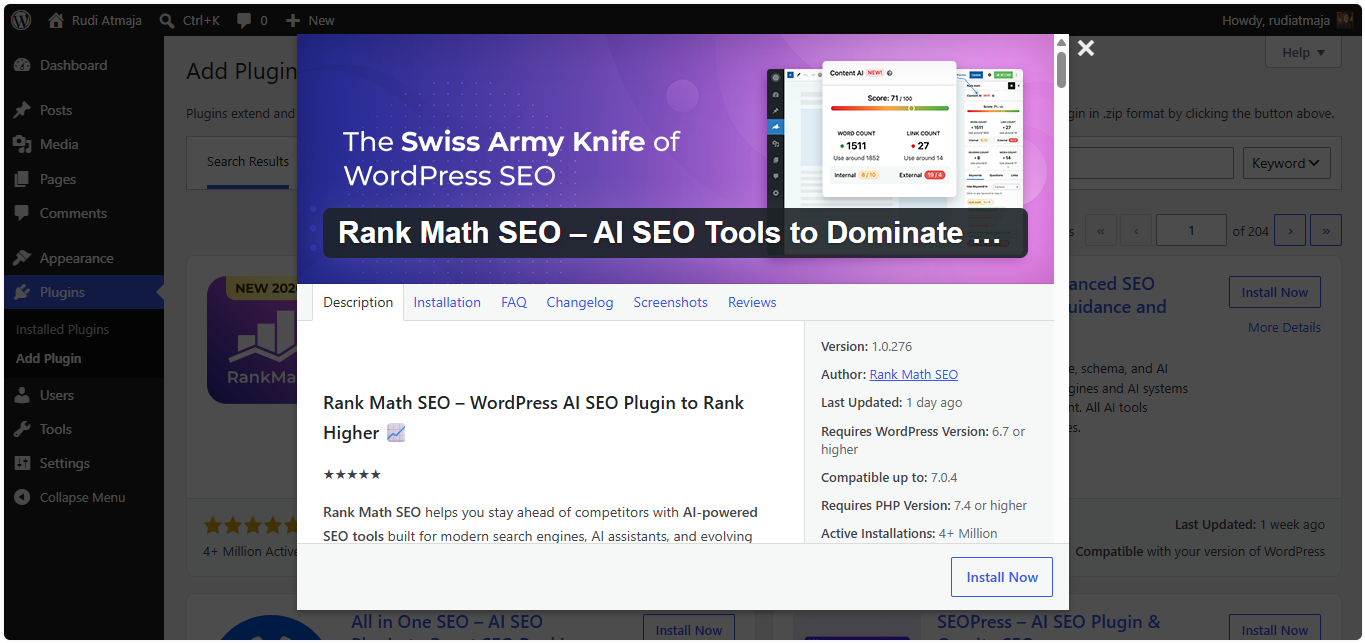
Take a moment to look through the search results and find the plugin that seems like the right fit. Inside each plugin box, you can click More Details to open additional information about that plugin. This is a good opportunity to check what the plugin does, its features, ratings, reviews, active installations, and other useful details before installing it.
Do not rush through this part, especially if several plugins look similar. Read the available information carefully and make sure the plugin actually provides the features you need. Once you have found the right one, you can move on to the next step and install it on your WordPress website.
3. Install and Activate the Plugin
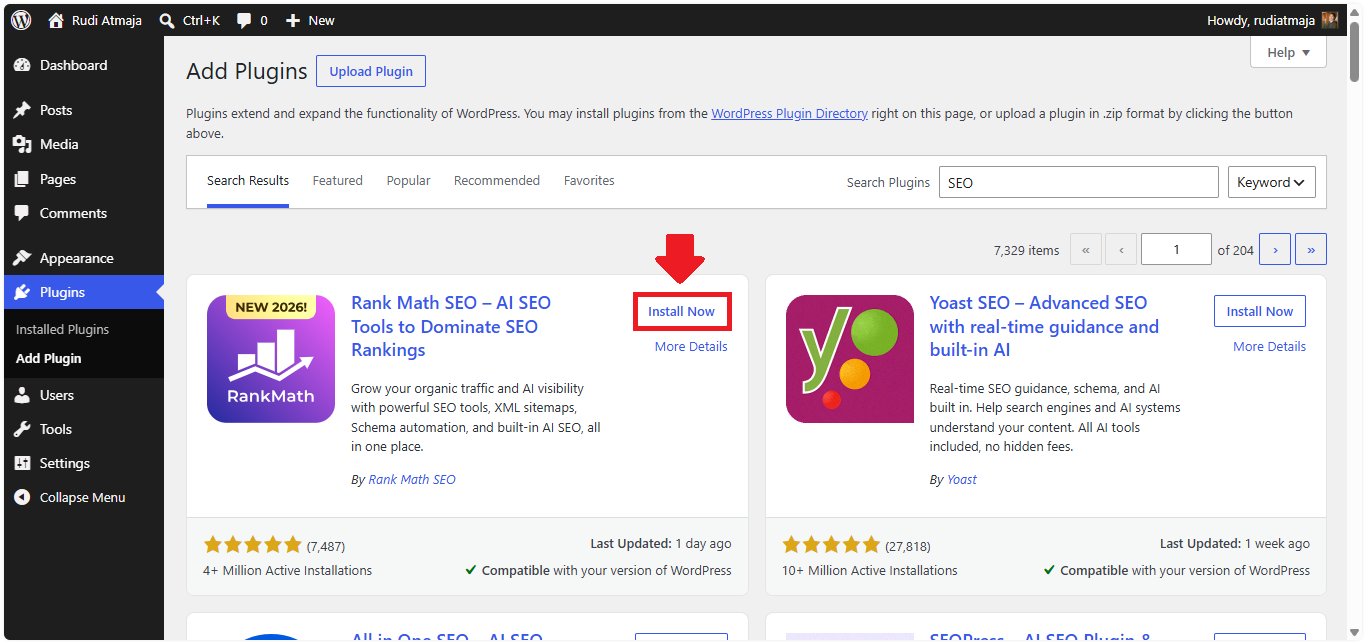
Once you have found the right plugin, the next step is to install it on your WordPress website. Before clicking anything, double-check the plugin name and make sure it is the one you actually want to use. When you are ready, click the Install Now button inside the plugin box to begin the installation.
WordPress will automatically download the plugin files and install them on your website. The process usually takes only a few moments, so you do not need to leave the page while it is running. When the installation is complete, the Install Now button will change to an Activate button.
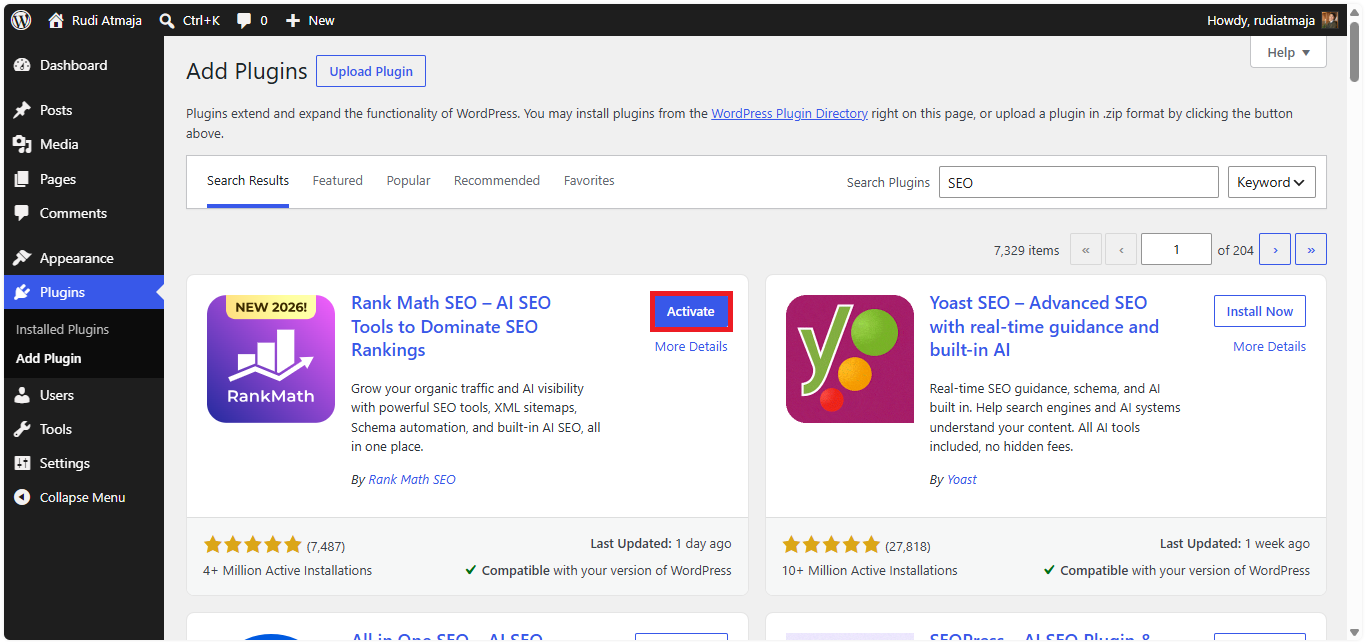
Click Activate to turn the plugin on and make its features available on your website. Keep in mind that installing a plugin and activating it are two different steps, so the plugin will not actually work until you activate it. After activation, WordPress may take you directly to the plugin’s settings page or show a new menu in the dashboard.
Once the plugin is active, take a moment to check whether everything looks normal. Some plugins may require additional configuration before you can start using their features, while others work immediately after activation. If the plugin has a setup wizard or configuration page, follow the recommended steps to finish the initial setup.
Method Two: Install a Plugin File
Not every plugin is available directly in the WordPress plugin directory, especially when you are using a premium plugin from a third-party developer. If you already have the plugin package as a ZIP file, you can install it manually through your WordPress dashboard. This method gives you a simple way to upload a plugin file without having to search for it in the WordPress plugin directory.
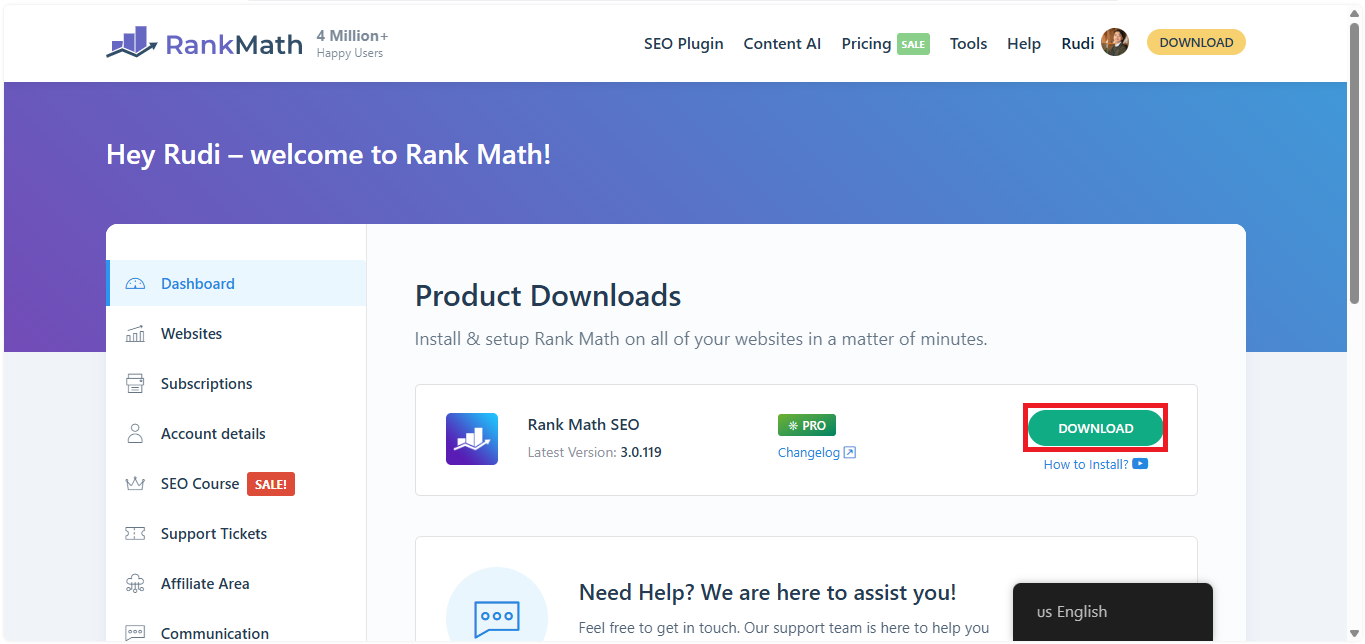
This method is particularly useful when you purchase a premium plugin from a plugin developer or marketplace and receive a ZIP file after completing your purchase. Instead of looking for the plugin through Plugins > Add Plugin, you can upload the ZIP package directly to your website. Just make sure the file you upload is the actual WordPress plugin ZIP file provided by the developer.
Before uploading the file, it is also a good idea to check that the plugin is compatible with your WordPress version and comes from a trustworthy source. A ZIP file can contain everything WordPress needs to install the plugin, but you still need to activate it after the upload is complete. Once the file is ready, you can continue with the following steps to upload, install, and activate the plugin.
1. Log In to Your WordPress.org Site Dashboard
Before uploading your plugin ZIP file, you first need to log in to your WordPress dashboard. Open your browser and visit yourdomain.com/wp-admin, replacing yourdomain.com with your actual website domain. This will take you to the WordPress login page where you can access your site’s administration area.
Enter the username or email address and password associated with your WordPress administrator account. Once you have entered the correct login details, click Log In to continue. If your credentials are correct, WordPress will redirect you to the dashboard automatically.
2. Upload & Install the Plugin File
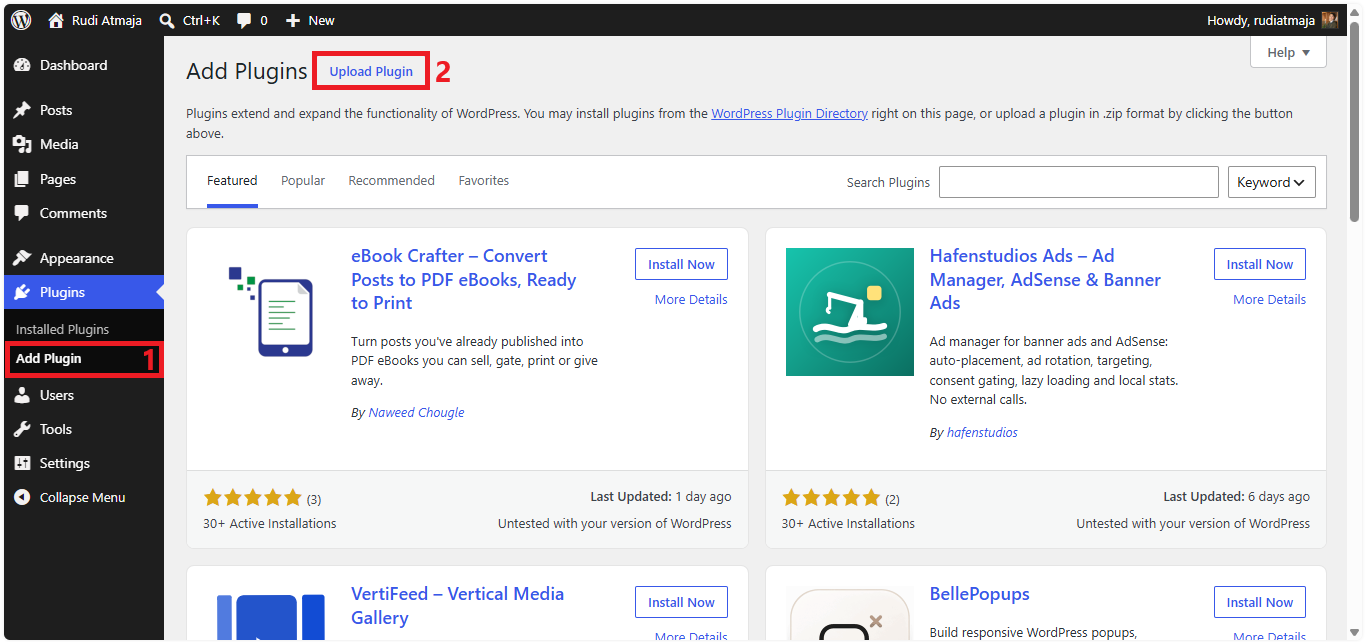
Once you are inside your WordPress dashboard, go to Plugins > Add Plugin to start uploading your plugin file. On the Add Plugins page, look for the Upload Plugin button, which is usually located near the top of the page. Click this button to open the upload area where you can select the plugin ZIP file from your computer.
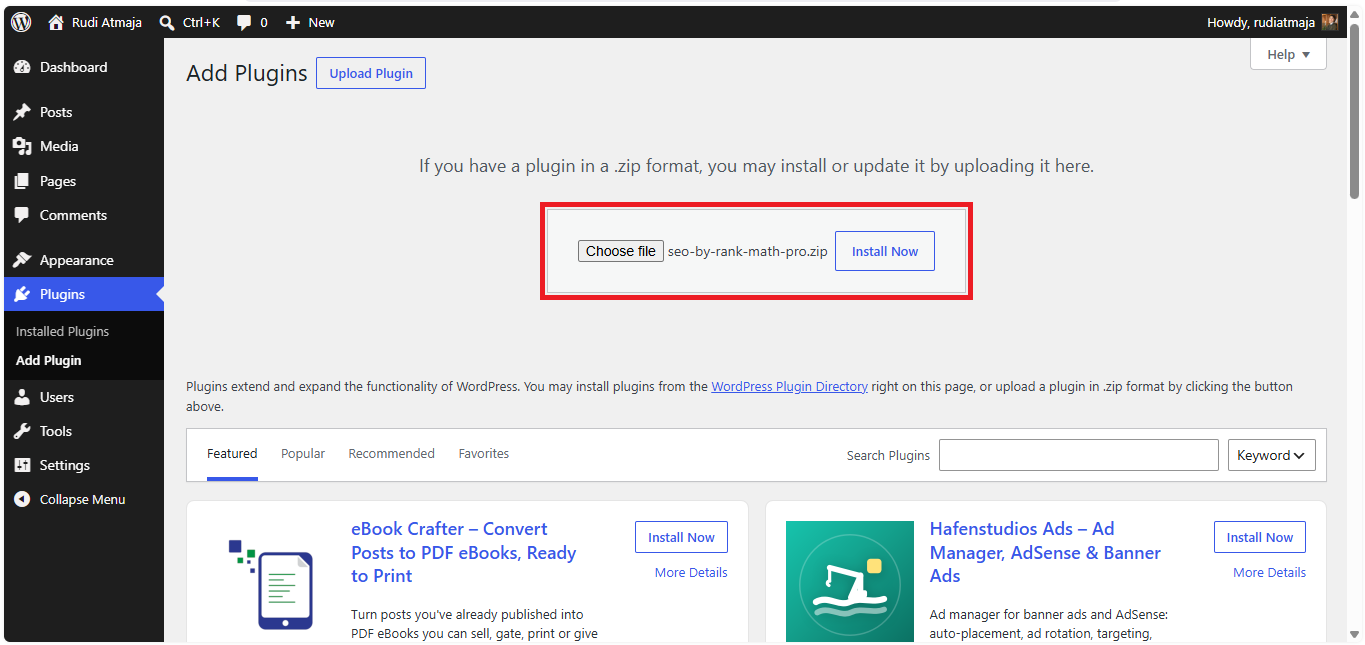
Next, click Choose File and locate the ZIP file you received from the plugin developer or marketplace. Select the file and make sure you are uploading the correct plugin package, especially if you have downloaded several files or versions. Once the file is selected, click Install Now to let WordPress upload and install the plugin automatically.
WordPress will then upload the ZIP file and extract its contents into the appropriate plugin directory on your website. Depending on the size of the plugin and your hosting connection, this process may take a few moments. When the installation finishes successfully, WordPress will display a confirmation message indicating that the plugin has been installed.
If WordPress shows an error during the upload, do not immediately assume that the plugin is broken. Check whether you selected the correct ZIP file and make sure the ZIP contains the actual plugin files rather than documentation, license files, or another compressed folder. If everything looks correct and the installation succeeds, you can continue to the next step to activate the newly installed plugin.
3. Activate the Plugin
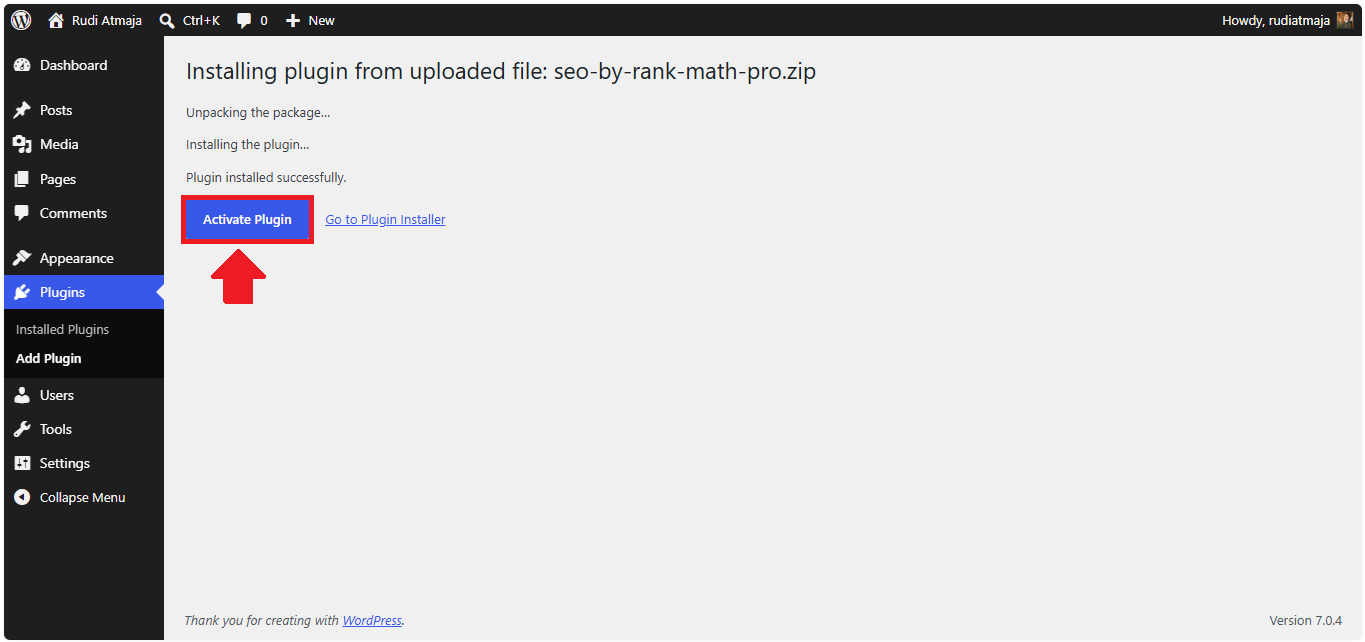
After the plugin has been uploaded and installed successfully, the next step is to activate it. WordPress will usually show an Activate Plugin button immediately after the installation is complete, so you can activate it right away. Simply click the button and WordPress will enable the plugin on your website.
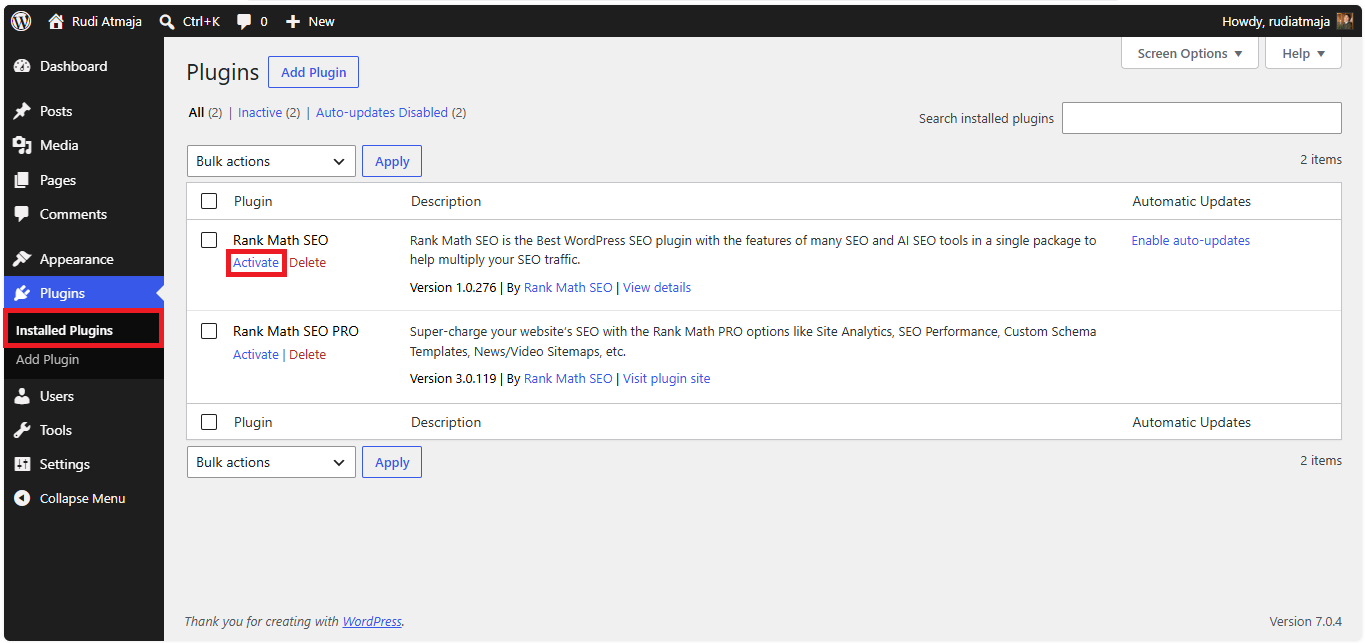
If you did not activate it immediately, you can do it later from the dashboard by going to Plugins > Installed Plugins. Find the plugin you just uploaded, then click the Activate link underneath its name. Once activated, the plugin will become available and its features can be used on your website.
After activation, check your WordPress dashboard to see whether the plugin has added a new menu, settings page, or setup wizard. Some premium plugins require additional configuration, such as entering a license key or connecting the plugin to an external service. Follow the plugin developer’s instructions to complete the setup and make sure everything is working properly.
It is also a good idea to visit your website and test the plugin’s main features after activation. Make sure the plugin behaves as expected and does not cause errors, broken layouts, or conflicts with other plugins. If everything works normally, your plugin is now successfully installed, activated, and ready to use.
How to Remove a WordPress Plugin
As your WordPress website grows, you may eventually install plugins that you no longer need. Perhaps you were testing a few different plugins, replaced an old plugin with a better one, or simply installed something that did not work as expected. Whatever the reason, removing unnecessary plugins is a simple way to keep your website cleaner and easier to manage.
Keeping unused plugins on your website is not always a good idea, especially when they are no longer maintained or updated by their developers. Outdated plugin files can potentially introduce security vulnerabilities, even if you are not actively using the plugin. Removing plugins you no longer need also reduces unnecessary files and makes it easier to keep track of the plugins that are actually important to your website.
Before deleting a plugin, it is important to understand the difference between deactivating and deleting it. Deactivating a plugin simply turns its features off while keeping the plugin files on your website, while deleting removes those plugin files from your WordPress installation. If you are certain that you will not use the plugin again, deleting it is usually the better choice for keeping your WordPress site tidy.
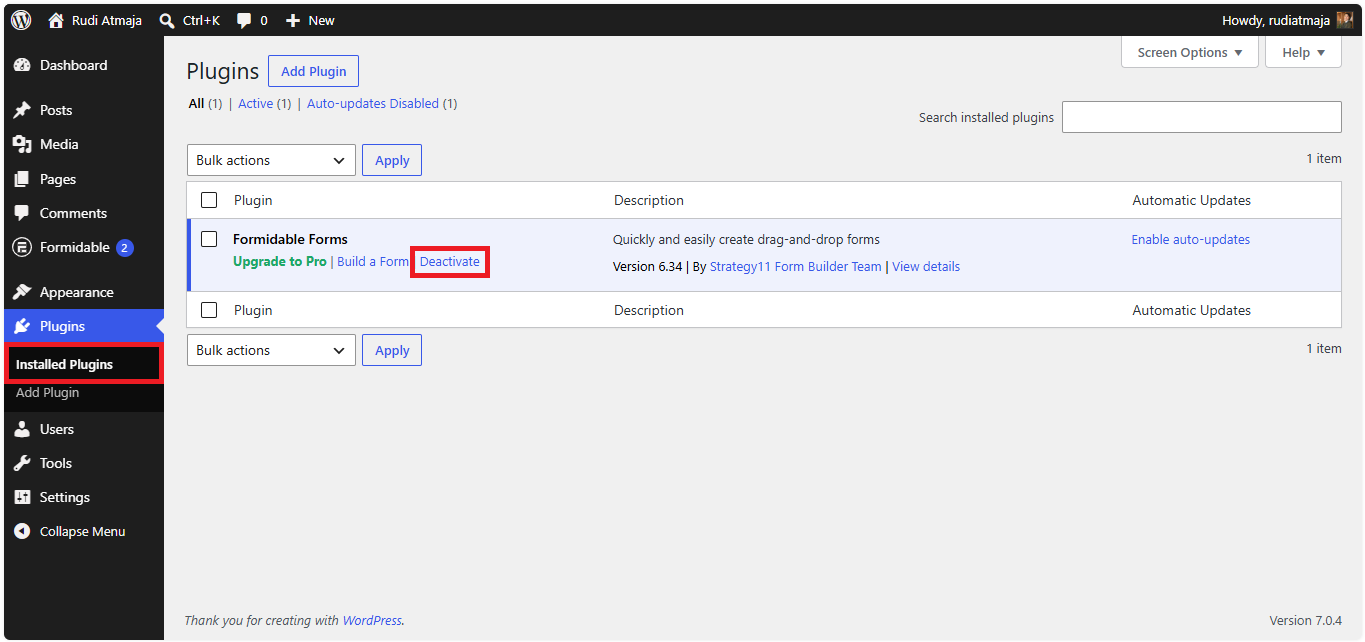
To start, log in to your WordPress dashboard using an administrator account. Once you are inside, look at the navigation menu on the left side and click Plugins, then select Installed Plugins. You will now see a list of all plugins currently installed on your website, including both active and inactive plugins.
Find the plugin you want to remove and carefully check its name before continuing. If the plugin is currently active, you will need to deactivate it before WordPress allows you to delete it. Click the Deactivate link underneath the plugin name, and WordPress will immediately turn off the plugin’s functionality.
After deactivating the plugin, visit your website and check whether everything still works normally. Pay special attention to pages, forms, layouts, or other features that may have depended on the plugin you just disabled. If everything looks fine and you are sure you no longer need the plugin, you can continue with the deletion process.
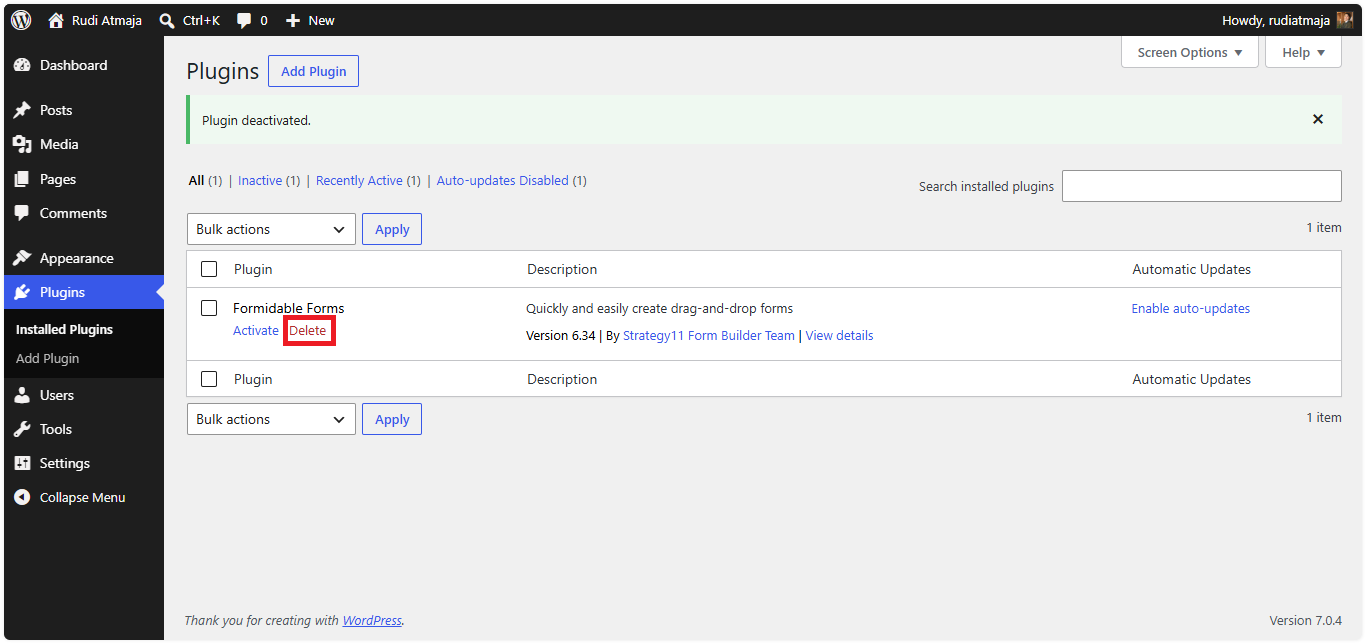
Return to Plugins > Installed Plugins and find the plugin you have just deactivated. You should now see a Delete link underneath its name, so click it to remove the plugin from your website. WordPress may ask you to confirm the action, and once you confirm it, the plugin files will be permanently removed from your WordPress installation.
Once the plugin has been deleted, take another look at your website to make sure everything is still working as expected. Some plugins may leave settings or other data in your WordPress database even after their files have been removed, so avoid manually deleting database information unless you know exactly what you are doing. If your website works normally after the cleanup, you have successfully removed the unnecessary plugin and can continue managing your WordPress site with a cleaner plugin setup.
Keep Your WordPress Plugins Under Control
Installing and managing WordPress plugins does not have to be complicated, as long as you know which method to use. You can install plugins directly from the WordPress dashboard when they are available in the plugin directory, or upload a ZIP file when you are using a premium plugin or a plugin downloaded from another trusted source. With the right steps, you can easily install, activate, and manage the plugins your website needs.
At the same time, do not forget to review your installed plugins from time to time. Remove plugins that you no longer use, especially those that are outdated, unsupported, or no longer provide any value to your website. Keeping only the plugins you actually need can make your WordPress installation easier to manage and help you maintain a cleaner website.
Now that you know how to install, activate, and remove WordPress plugins, you have everything you need to manage your site’s plugins with confidence. Always download plugins from trusted sources, keep the plugins you use updated, and test your website after making major changes. With a little regular maintenance, your WordPress plugins can add useful features without making your website unnecessarily difficult to manage.